下文记录了一台Ubuntu Linux机器的部署工作,供有需要的同学参考(大部分Windows PC都可以照此办法变为Linux机器):
1. 机器配置
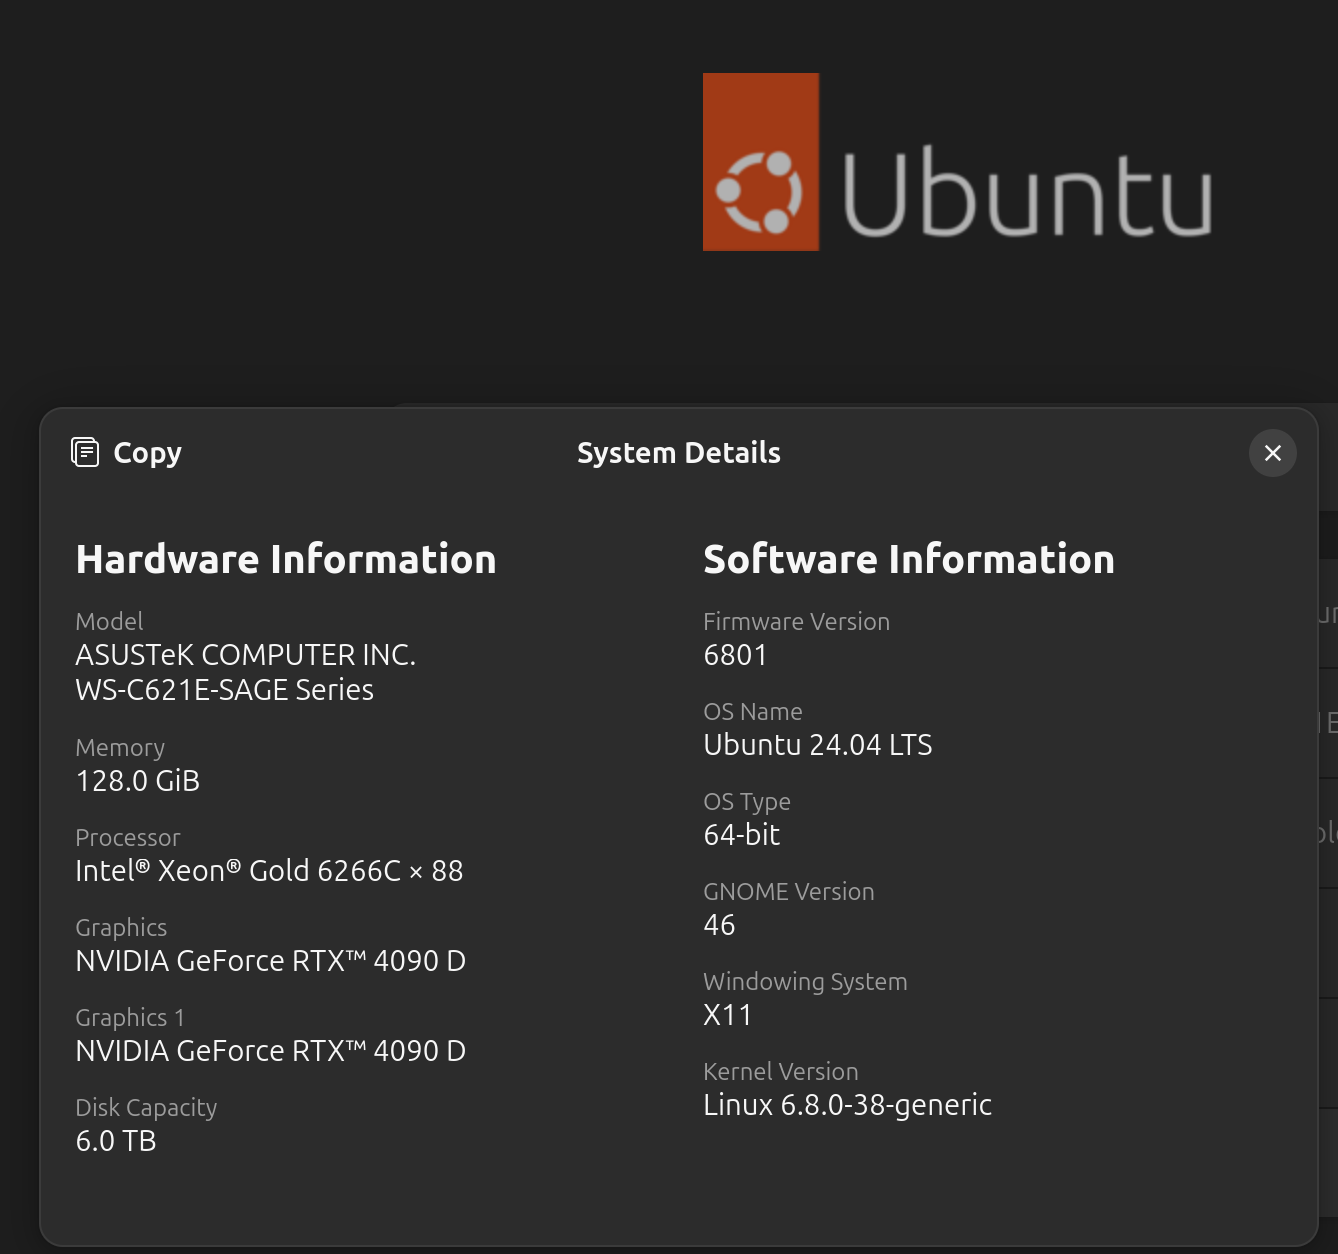
2024年7月收到的机器,配置信息概要如下:
- CPU:两块Xeon Gold 6266C 3.00GHZ芯片。22核、44线程、Max 3.4GHz。型号中的“C”代表定制版。
- GPU: 两张 NVIDIA GeForce RTX4090D显卡。14592 CUDA cores、24GB GDDR6X显存,2.28GHz基础频率。型号中的“D”代表Dragon,即应对限售令的中国特别版。综合来看,相较4090,性能砍掉了5%(更少的CUDA核心、更低的总功耗),还能接受。
- 内存: 4根Samsung 32G DDR4服务器内存,共128G。
- 存储:系统盘为2T的Samsung SSD,存储盘是由两块4T机械硬盘组成的4T容量的RAID1阵列(重要数据可备份于此,一般资料存放于系统盘
\home分区下即可)。 - 其他:ASUS WS-C621E-SAGE双路主板、1600W白金电源、Enthoo Pro Panteks追风者机箱。
2. 安装操作系统
- centos还是ubuntu? 供货商提前装好了centos7后交货的。考虑到centos7已于2024年7月停止更新;centos stream变成了RHEL的上游测试版;且本服务器主要用于机器学习、而非用于网站运营我;决定将操作系统更换为ubuntu。这样做可能牺牲了一点可靠性(centos较ubuntu更为稳定),但在日后维护、系统安全升级、驱动与软件安装方面的收益是压倒性的(ubuntu是众多机器学习工具包默认操作系统,且拥有更大的社群支持)。
- ubuntu desktop还是server? 目前最新的稳定版本为ubuntu 24.04LTS,默认提供5年的支持,但加入ubuntu pro(免费)后,可提供长达10年的支持。对于24.04LTS,桌面版与服务器版拥有同样的内核与仓库,日后可以通过简单的命令相互转换。两者的区别主要在于:桌面版的安装程序更大,因为默认带有GUI界面,而服务器版本默认是没有GUI的(后期可以通过简单命令行安装与卸载GUI);服务器版默认带有更多网络协议。
我最终的选择是:安装ubuntu desktop版,再手动安装ssh、ftp等网络协议,将机器变为服务器。使用半年后,视情况考虑卸载GUI,将机器变成headless server。 - 安装ubuntu desktop。 去ubuntu官网下载24.04LTS desktop版的安装程序(约6G大小,使用迅雷下载速度更快),在windows电脑上用Ultraiso打开下载的.iso文件,并使用“启动“下的“写入硬盘映像”功能,将插入的U盘制作为启动盘。接着将U盘插入机箱,开机后按住Del键进入BIOS设定(仅针对华硕主板),修改BOOT顺序后重启,进入ubuntu安装流程。
- ubuntu desktop自带驱动与Nvidia显卡的不兼容问题。 ubuntu自带的显卡驱动nouveau与NVIDIA独立显卡之间可能不兼容。在安装ubuntu desktop过程中,需要图形界面做引导,如果显示器连接的是集成显(往往是VGA接口),一般不会有问题。但如果显示器连接的是Nvidia显卡(往往是Hdmi、DisplayPort等接口), 会导致安装画面静止不动(如果安装ubuntu server,通过命令行做引导,则无此问题),看起来像死机的状态。
- 如果安装系统时不得不用Nvidia显卡连接显示器,上述问题的解决办法,是在保存BOOT更改顺序后重启时,进入GRUB界面选择启动项时(如果没有进入GRUB界面,则在开机后长按住
Shift键),将光标移动至Install Ubuntu选项后,不要直接按Enter键,而是按下e键进行启动选项编辑,并在开头为linux的那一行(一般来说是倒数第二行),在quiet splash后面空一格再加上acpi_osi=linux nomodeset(有时quiet splash后面本就有别的字符,不用管它,确保我们要加的字符插入splash后面即可),修改完成后Ctrl+X或者F10推出就能进入正常安装流程。 - 注意:上面的问题,在成功安装ubuntu、拔出安装u盘后,机器重启第一次进入系统时,还会存在(一直黑屏)。而且如果安装过程中选择了格式化整个系统盘、抹掉原有系统,那么机器开机时只会找到一个BOOT源,继而自动跳过GRUB界面。解决的办法,仍然是在开机的时候就长按
Shift键,出现GRUB界面后,再在进入ubuntu系统的选项上按e键,重复上述操作,加入相应字符,即可首次进入系统。 - 在GUI与命令行界面中切换。 ubuntu系统运行时,
Ctrl+Alt+F3默认切换到命令行界面,Ctrl+Alt+F2切换到图形界面(从F1到F6都有类似的tty功能)。如果后续运行中独立显卡驱动出了问题,可使用这个办法进入图形界面进行操作(例如将nouveau从禁止列表中暂时删除)。
- 如果安装系统时不得不用Nvidia显卡连接显示器,上述问题的解决办法,是在保存BOOT更改顺序后重启时,进入GRUB界面选择启动项时(如果没有进入GRUB界面,则在开机后长按住
- 磁盘分区选择。 ubuntu安装过程中,最好不要选择默认安装模式,而是选择手动分区,因为前者只会设置一个根目录分区。一般来说,我们需要至少将
/home独立分区,这样如果将来需要重装系统,我们只需要覆盖根目录后,再将原有的/home分区挂载在系统上即可,这样不用折腾用户资料。
目前操作系统占用了整个系统盘2T空间,除了安装引导程序自动选择的/boot/efi分区(大概1.3G)以外,其他分区选择如下:- 根目录
/,分给370G,用于存放系统文件和大部分计算相关软件。 - 目录
/home,分给了1.48T。 - 交换分区
SWAP,机器内存有128G,从运行的角度来看,其实可以不设置交换分区。但考虑到未来可能有休眠的需求,交换分区最好为内存容量的1.1倍(以便将内存中所有数据写入硬盘了再关机),分给了144G(后续使用中,如果确无需要,还可以再修改SWAP分区大小,释放更多空间给前面两个分区)。
- 根目录
3. Ubuntu系统设置
3.1 给root用户添加密码
- 首次进入系统后,给root添加密码:
sudo passwd root。 - 同时,也可考虑给当前用户(一般为服务器管理员)sudo权限:
sudo visudo后,在末尾加上xxxyyyzzz ALL=(ALL) NOPASSWD: ALL后保存退出,其中xxxyyyzzz为当前用户。
3.2 更换ubuntu下载源
可将ubuntu的仓库下载源更换为国内服务器(有多个大学以及阿里、华为等源可选择),这样以后从仓库下载、更新软件速度会快一些。下述两种办法都可以:
- 图形界面方式:在桌面点击
Show Apps后,选择Software Updater,再进入Settings后,于选项卡Ubuntu Software中弹开Download from并选择Other,然后选择国内的ali源。或者使用Select Best Server功能选择下载测试速度最快的节点,最后根据系统提示点击reload即可启用新源。 - 命令行方式:命令行中打开文件
sudo nano /etc/apt/sources.list.d/ubuntu.sources,将内容替换为:
Types: deb deb-src
URIs: https://mirrors.aliyun.com/ubuntu/
Suites: noble noble-updates noble-backports noble-security noble-proposed
Components: main restricted universe multiverse
Signed-By: /usr/share/keyrings/ubuntu-archive-keyring.gpg

Types: deb deb-src
URIs: https://mirrors.tuna.tsinghua.edu.cn/ubuntu/
Suites: noble noble-updates noble-backports noble-security noble-proposed
Components: main restricted universe multiverse
Signed-By: /usr/share/keyrings/ubuntu-archive-keyring.gpg

Types: deb deb-src
URIs: http://mirrors.163.com/ubuntu/
Suites: noble noble-updates noble-backports noble-security noble-proposed
Components: main restricted universe multiverse
Signed-By: /usr/share/keyrings/ubuntu-archive-keyring.gpg

Types: deb deb-src
URIs: https://mirrors.ustc.edu.cn/ubuntu/
Suites: noble noble-updates noble-backports noble-security noble-proposed
Components: main restricted universe multiverse
Signed-By: /usr/share/keyrings/ubuntu-archive-keyring.gpg

Types: deb
URIs: http://cn.archive.ubuntu.com/ubuntu/
Suites: noble noble-updates noble-backports
Components: main restricted universe multiverse
Signed-By: /usr/share/keyrings/ubuntu-archive-keyring.gpg

Types: deb
URIs: http://security.ubuntu.com/ubuntu/
Suites: noble-security
Components: main restricted universe multiverse
Signed-By: /usr/share/keyrings/ubuntu-archive-keyring.gpg
最后,无论使用哪种方法,都需要更新下载设置以及系统软件:
1 | sudo apt-get update |
3.3 安装Nvidia显卡驱动
此部分共分为两个步骤:安装Nvidia显卡驱动,禁用系统自带的nouveau驱动。
3.3.1 安装Nvidia驱动
方法一。最简单的方法,其实就是直接使用ubuntu的图形界面引导:在Software Updater里面选择Settings,然后进入Additional Drivers选项卡,选择第一个即可。
方法二。在终端查看可用驱动:ubuntu-drivers devices,然后选择server版的driver安装:
sudo apt install nvidia-driver-550-server
说明,ubuntu apt里面能搜到的往往是最新的production branch版本,使用即可。nvidia官网可能会提供更新版本的驱动(如现在就有555),但往往属于new feature branch,不是稳定版本,不适合安装。
另外,同一版本驱动,有普通版和server版本。选择server版本,因为有诸如多GPU支持等针对服务器的功能。
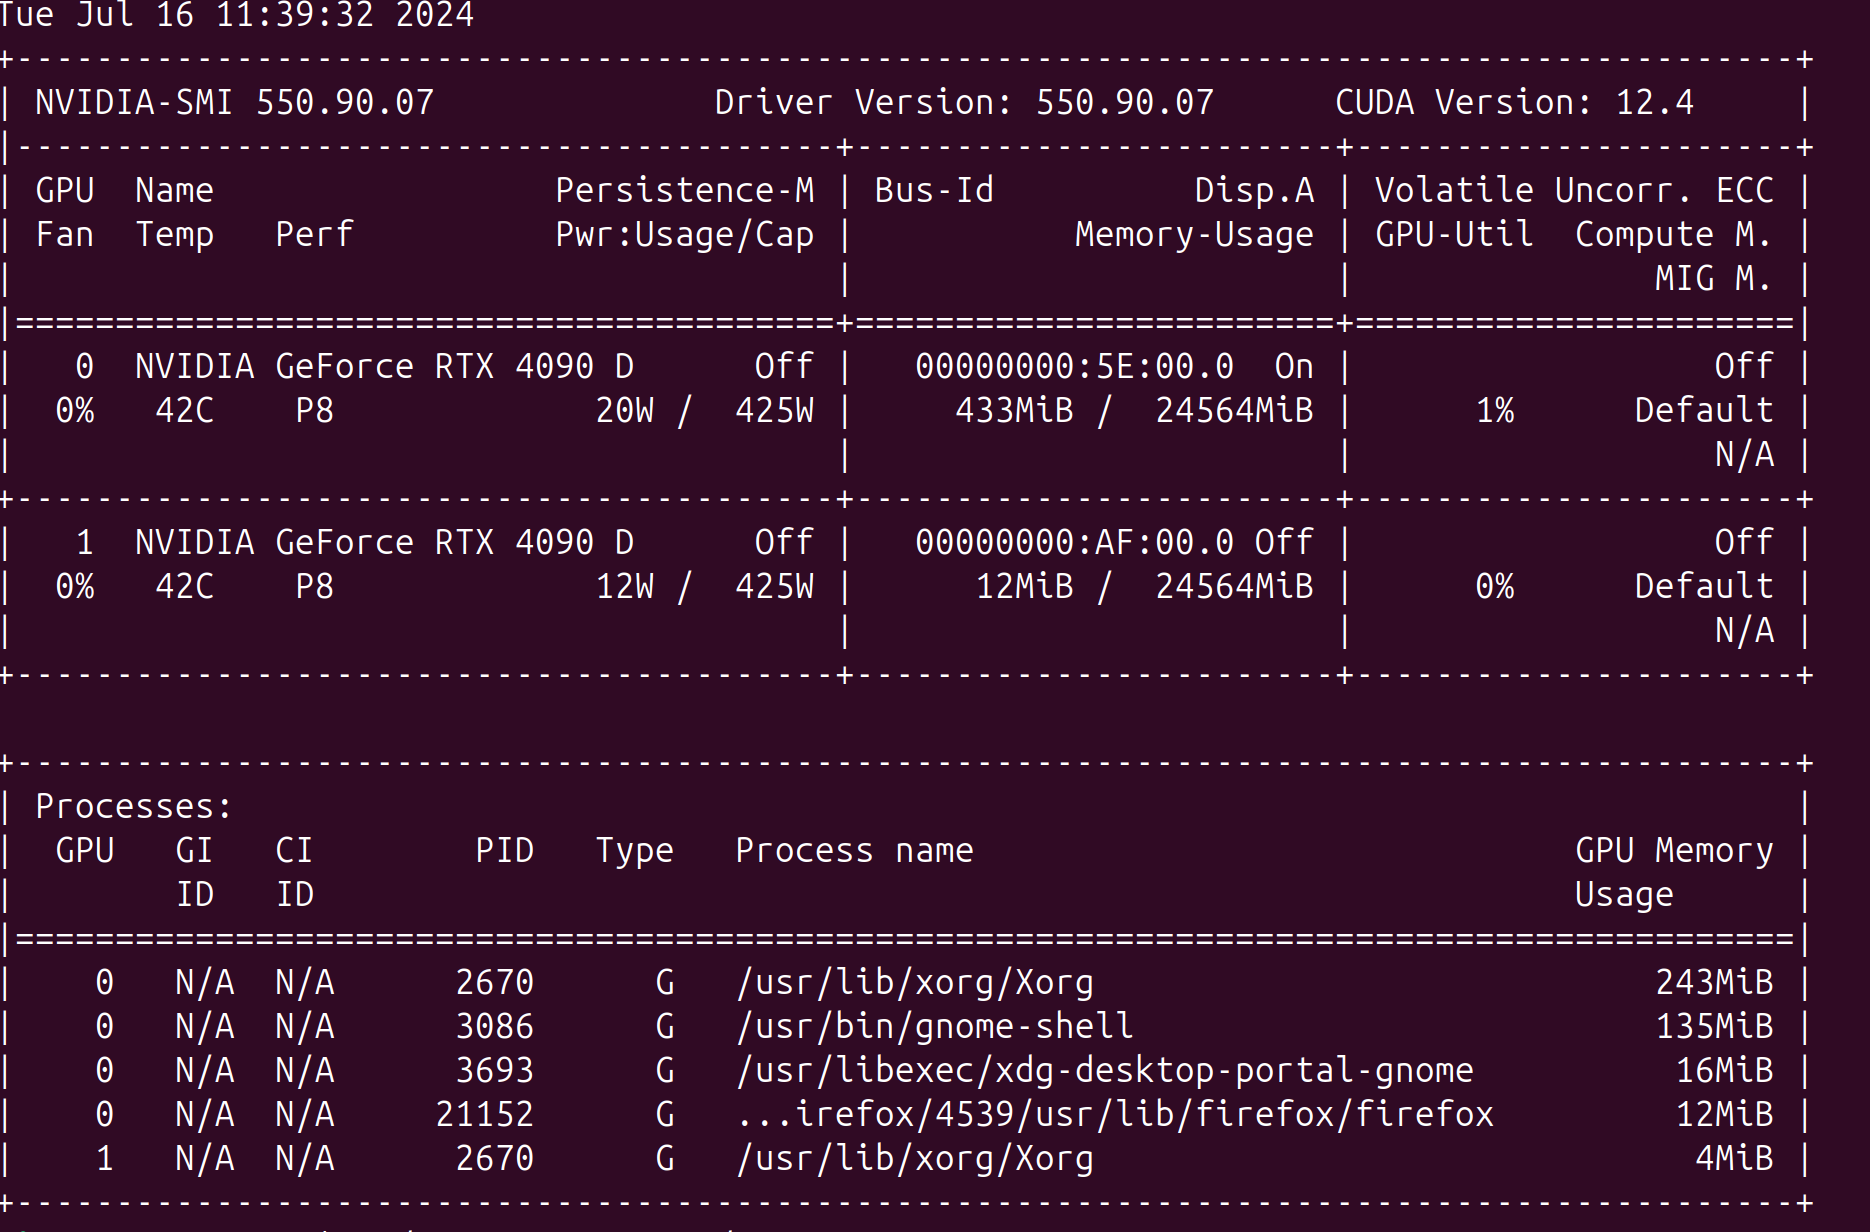
在终端输入:nvidia-smi,如能显示显卡信息,就说明Nvidia显卡驱动安装成功。
3.3.2 禁用nouveau驱动
系统自带驱动nouveau的存在,会阻止系统自动使用Nvidia显卡驱动。解决办法是将前者禁用。
打开文件sudo nano /etc/modprobe.d/blacklist.conf,并在文件末尾添加:
1 | blacklist nouveau |
改完要更新系统镜像文件,在终端中输入:sudo update-initramfs -u
完成后重启Ubuntu,开机后在终端中输入:lsmod | grep nouveau
如果没有输出就说明禁用了nouveau
3.4 开启网络服务
当安装的desktop版、且选择的最小安装模式时,系统里面没有自带ssh、ftp等网络服务。需要手动开启。
3.4.1 开启ssh服务
在终端中输入:sudo apt install ssh,即可安装并自动开启ssh服务和sftp服务。
注意使用ftp代理软件连接服务器时,记得选择SFTP连接,因为服务器使用的是SSH File Transfer Protocol。
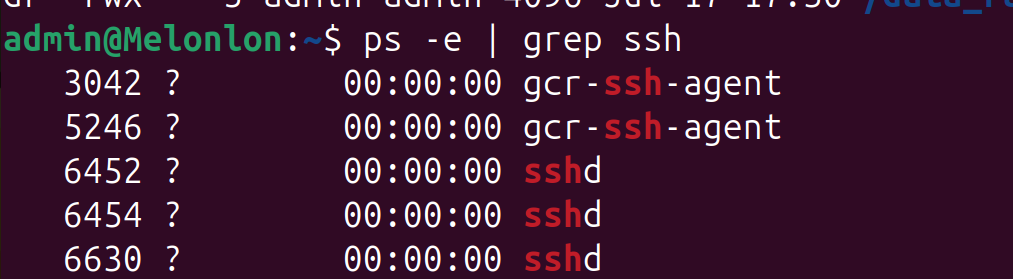
可在终端输入命令查看ssh是否运行了:ps -e | grep ssh。
ssh和sftp代理软件,市面上有挺多。windows下,可分别使用Xshell和Xftp(去NetSarang官网下载正版,个人用户免费)。
mac下,可分别使用系统自带的terminal和FileZilla。
也可以所有设备(包括macos, windows, linux, ios, anroid)均使用或使用个人免费版的Termius,界面简洁漂亮、集合了ssh和sftp功能,每台设备都注册一个单独的账号即可。
3.4.2 root的ssh登陆权限、SSH Key登录设置
root账户的级别太高,为了安全起见,系统默认是禁止root账户通过ssh登陆的。如果一般的用户已经拥有了sudo权限,那么可以使用该用户登陆后再通过su root命令切换到root用户,这是更为稳妥的办法。
但是如果需要开通root的ssh登陆权限的话,可以这么做:
首先,编辑文件:sudo nano /etc/ssh/sshd_config
在文件中找到这么一行:
PermitRootLogin prohibit-password
将文中的prohibit-password替换成yes,保存后退出,
再重启ssd服务即可:
sudo systemctl restart ssh
关于SSH Key登录设置,可参见这里的说明。大体上,只需要在自己的电脑上生成公钥和私钥,并将公钥中的信息写入服务器中特定文件即可。
3.4.3 关于远程桌面(安装xrdp)
尽管一般的数据传输、计算运行通过ssh均可高效达成,偶尔也会碰到需要连接远程桌面的场景。
当无法解决公网ip问题时,可使用向日葵(sunlogin)等常见的远程控制软件。当拥有公网ip时,则可使用rdp和vnc等连接方式。
向日葵的安装、注册、使用方式,是平凡的,下面记录一下xrdp搭建过程:
首先是安装:sudo apt install xrdp
安装完成后,xrdp服务将会自动启动,可以输入这个命令验证:sudo systemctl status xrdp
默认情况下,xrdp 使用/etc/ssl/private/ssl-cert-snakeoil.key,它仅仅对ssl-cert用户组成员可读,所以需要运行下面的命令,将xrdp(安装服务过程中生成的虚拟用户)添加到这个用户组,且让xrdp于启动时(而非登陆时)运行,并允许访问xrdp的默认端口号3389,并查看3389端口是否已经放行 :
sudo adduser xrdp ssl-cert
sudo systemctl enable xrdp
sudo systemctl restart xrdp
sudo ufw allow 3389
sudo lsof -i:3389
最后使用Windows自带的远程桌面软件(或者mac在app store里面下载的Microsoft Remote Desktop)连接服务器IP地址即可。xrdp环境下,可实现桌面同步、文件复制粘贴、甚至声音同步。
注意:在ubuntu中,每个用户只可以登陆一次桌面(不像ssh,可以有多个instances),所以如果一个账号在本地已经登陆了桌面,是无法通过xrdp建立远程桌面连接的。测试的时候要注意这点,不要误以为没有设置好。
3.5 公网ip与内网穿透
目前为止,机器的远程连接只能在局域网下进行。这是因为无论是将服务器放置于家里还是放置于办公室,机器的ip地址,都只是经过多层NAT转换后的内网地址(尽管可以设置为静态ip以方便在内网使用)。而内网ip地址是无法在公网通过ssh或者sftp连接的。
为了能随时随地连接服务器,我们需要实现内网穿透。方式有两种:1. 通过花生壳之类的DDNS服务器平台做转发(简单稳定,持续付费,每个端口都要额外付费)。2. 自己搭建具备公网ip的云服务器,通过frp之类的软件做反响代理来实现内网穿透(便宜,端口数量可以任意设定)。
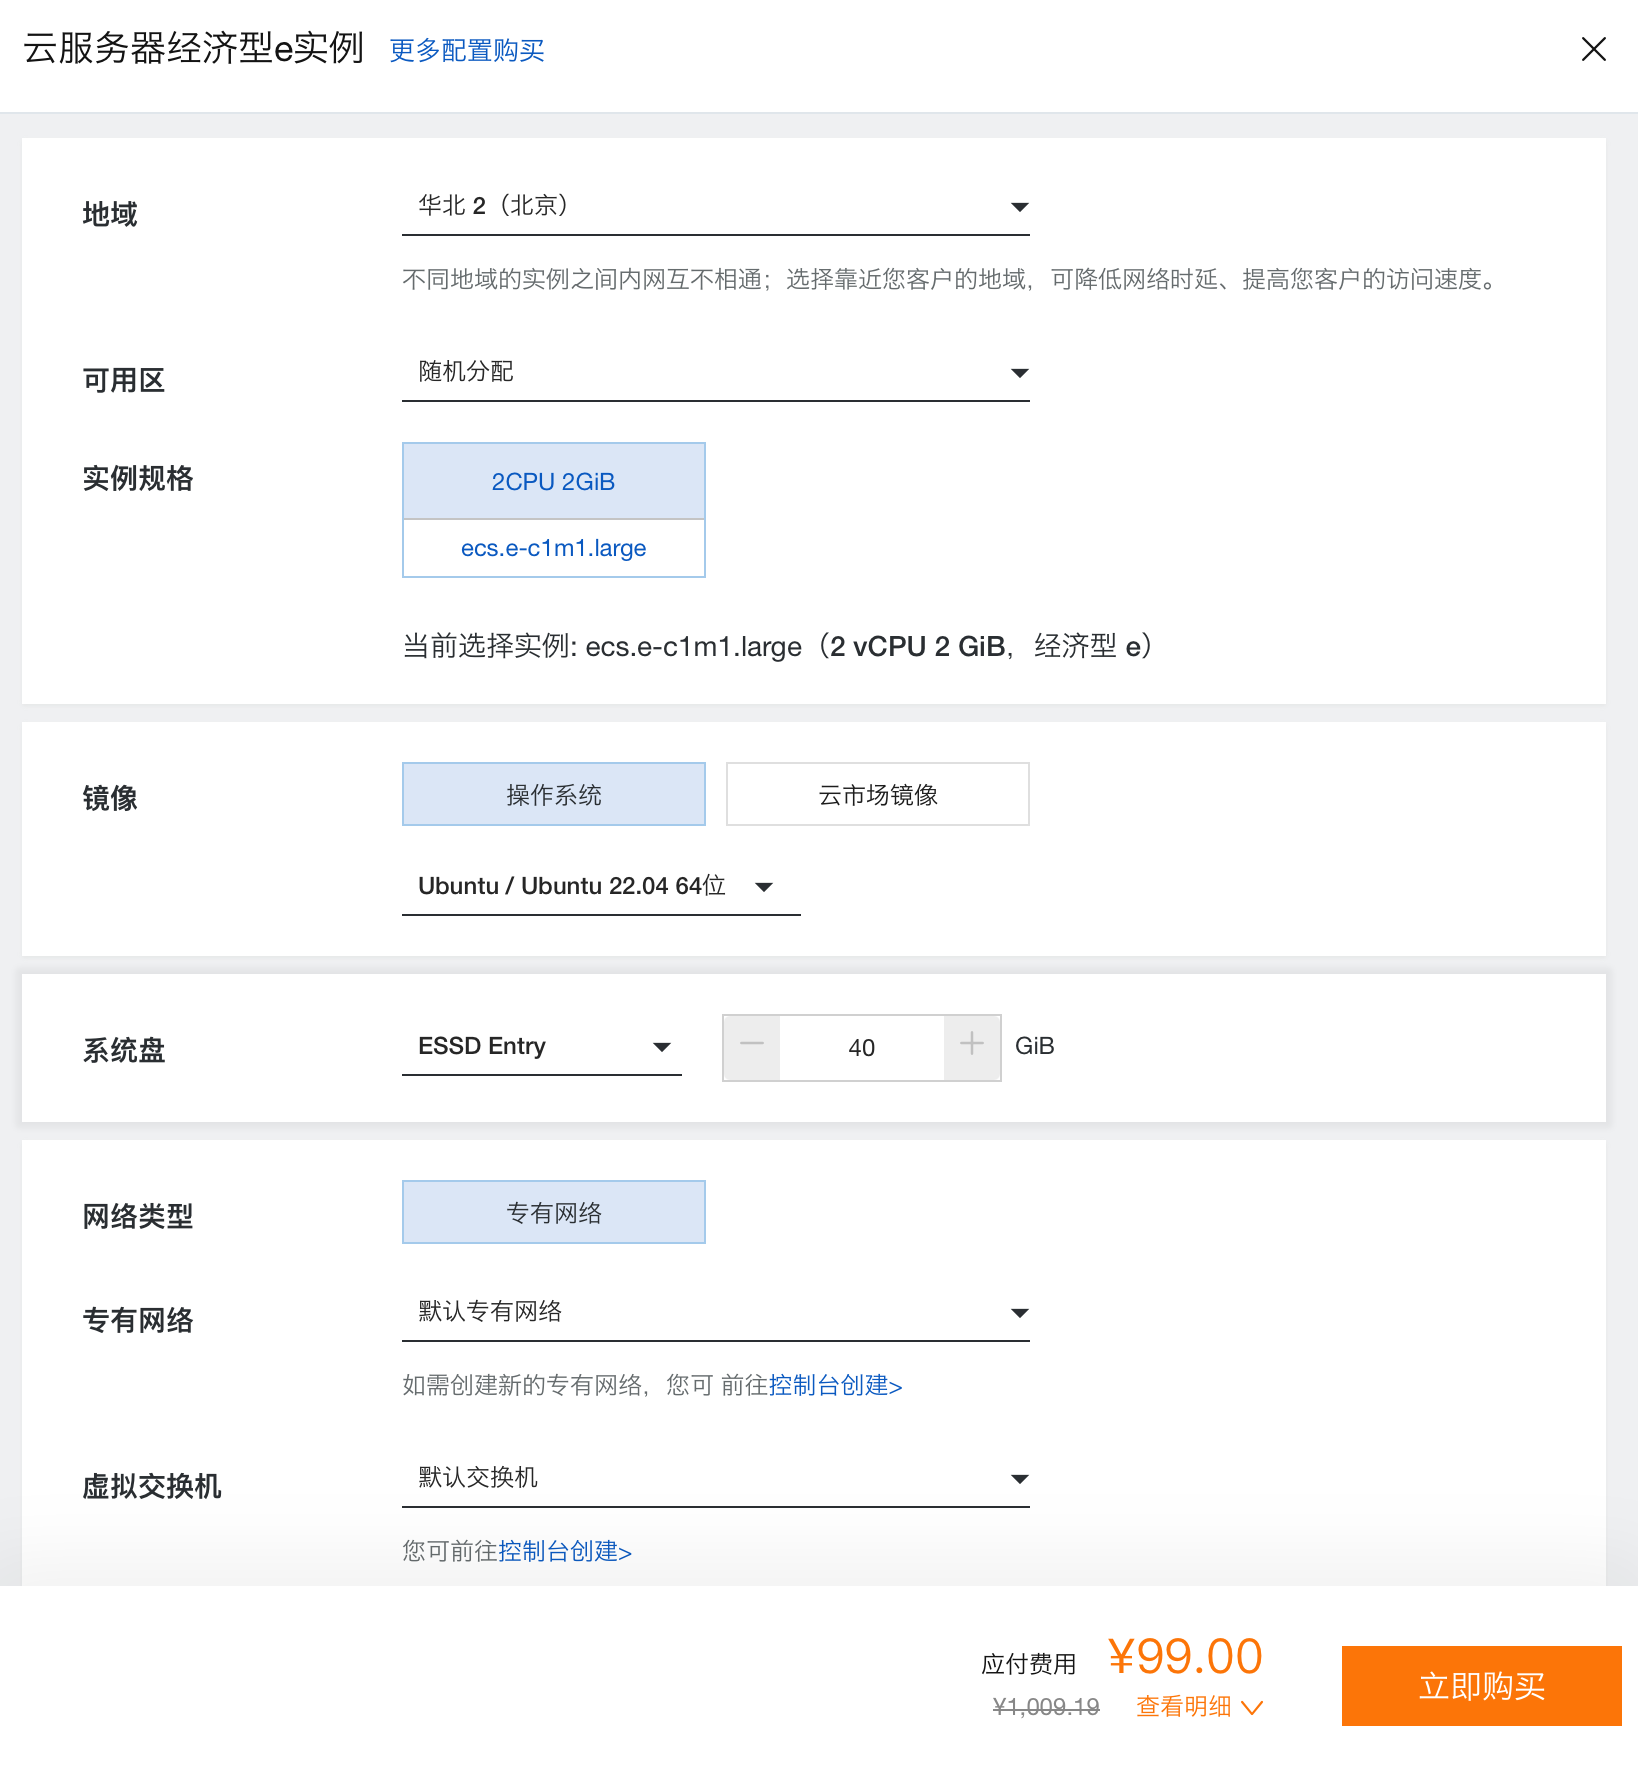
这几年国内云服务器行业产能过剩,一直在降价。截至2024年7月,最大的两家阿里云和腾讯云都有99元/年的云服务器产品出售。机器配置一样,均为2核2G,约40G的ssd。不同之处在于腾讯云提供4M固定带宽和300G每月流量限制,而阿里云提供3M固定带宽和无限流量。综合比较后,我决定选用阿里云的ecs弹性服务器经济型。购买订单见下图,官方宣称的折扣信息很搞笑。
下面介绍如何安装配置frp:
frp分为frps(server)和frpc(client)两个包 ,前者安装在阿里云服务器上,后者安装在本服务器上。
3.5.1 在云服务器上安装frps (server)
先去frp主页下载适合的版本。本服务器操作系统是ubuntu24,阿里云服务器为ubuntu22,因此下版本为**frp_0.59.0_linux_amd64.tar.gz
**的安装文件,可供两台机器使用。
将安装文件上传至阿里云服务器的某新建路径下。既可以通过sftp传输,也可以在阿里云中输入下面命令完成:
wget https://github.com/fatedier/frp/releases/download/v0.59.0/frp_0.59.0_linux_amd64.tar.gz
在阿里云中解压缩:
tar -zxvf frp_0.59.0_linux_amd64.tar.gz
进入解压缩后得到的路径,看到两个二进制文件,将他们移动到/usr/local/bin目录中以方便运行:
1 | sudo mv frps /usr/local/bin |
接下来,我们为frp server创建一个配置文件:
sudo mkdir /etc/frp
sudo mv frps.toml /etc/frp/
sudo mv frpc.toml /etc/frp/
sudo nano /etc/frp/frps.toml
往frps.toml中写入下列内容并保存:
1 | [common] |
保存配置后,使用下面命令启动frp server:
frps -c /etc/frp/frps.toml
看起来阿里云服务器成功运行frps了:

接下来,为frps添加服务,并设置开机运行。
首先,在/etc/systemd/system/路径下新建服务文件:
sudo nano /etc/systemd/system/frps.service
在文件中写入:
1 | [Unit] |
最后,刷新服务列表,设置开机自启、启动frps.service:
1 | sudo systemctl daemon-reload |
阿里云重启后,在终端确认frps.service的状态是成功启动:
sudo systemctl status frps.service
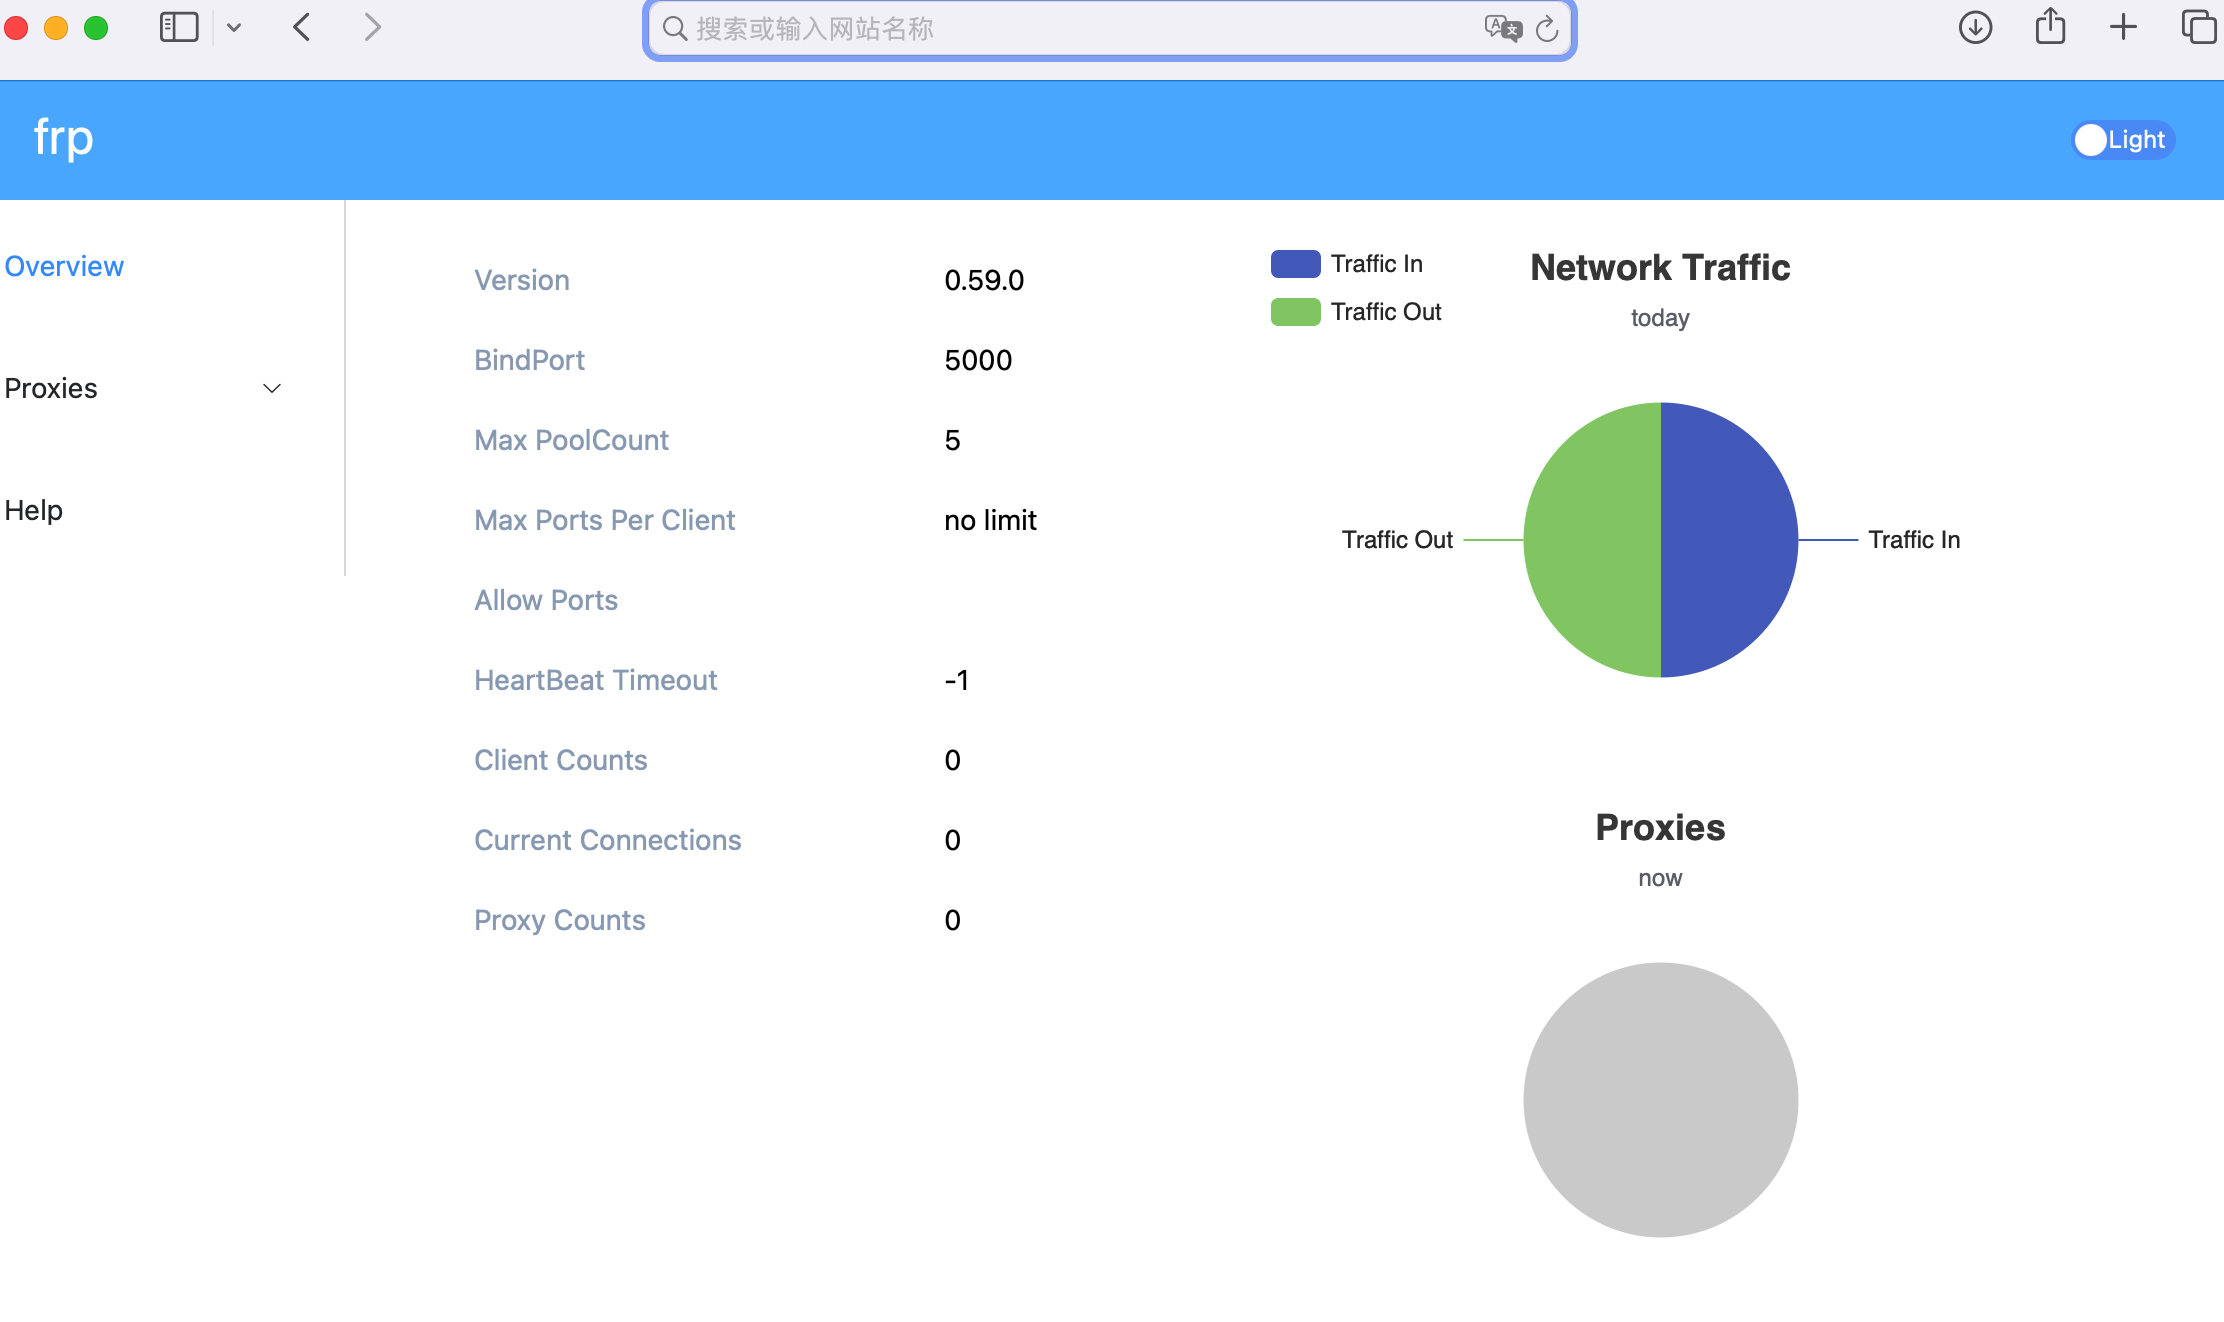
在浏览器输入 [云服务器的公网ip]:5500 即可访问到frp的web管理界面。
如果无法访问该页面,要么是因为云服务器开启了防火墙,需要去开启特定端口;要么是因为云服务器商关闭了端口。
经过排查,阿里云服务器中甚至都没有开启防火墙(ufw状态是inactive)。
问题发生在阿里云的“安全组”功能,阿里云默认关闭了服务器出了必要端口外的所有端口访问。解决办法,是登陆阿里云,找到云服务器的实例后,在“安全组”下,选择“管理规则”,再手动添加放行端口即可,如下图:

虽然启动frps服务我们其实只需要放行5000和5500这两个端口。但frp可以反向代理任意数量的设备和任意数量的服务,每个设备的每个服务都对应一个特定的端口。因此我们开放了1001个端口为未来需求作准备。
现在去浏览器输入 [云服务器的公网ip]:5500,能看到frp的web管理界面了:
3.5.2 在本服务器上安装frpc (client)
有了前面的铺垫,在本服务器上安装frpc,就特别简单了。除了配置文件有所不同,整个步骤几乎一样(只是将命令中的frps换成了frpc)。
第一步,在本服务器上安装frp软件,放置和创建好各个文件。frp软件,既可以像前文中阿里云服务器那样使用wget命令从官网下载,也可以使用scp命令从阿里云服务器直接下载。
1 | mkdir frp |
第二步,完成frpc配置。
打开配置文件sudo nano /etc/frp/frpc.toml 并写入下列内容:
1 | # 客户端配置 |
测试确认frpc可以正常开启:
frpc -c /etc/frp/frpc.toml
第三步,在本服务器上创建frpc.service,并设置开机自动启动。
在/etc/systemd/system/路径下新建服务文件:
sudo nano /etc/systemd/system/frpc.service
在文件中写入:
1 | [Unit] |
然后,刷新服务列表,设置开机自启、启动frps.service:
1 | sudo systemctl daemon-reload |
本服务器重启后,在终端确认frps.service的状态是成功启动:
sudo systemctl status frpc.service
至此,内网穿透目标实现:ssh、sftp、xrdp均可通过阿里云服务器进行反向代理,连接本服务器。
3.5.3 (可选)开启frp的xtcp服务,实现端对端高速内网穿透
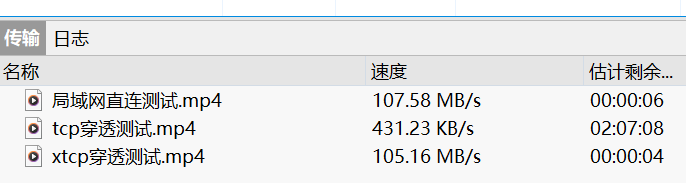
到目前为止,本服务器已经可以很稳定地从任何地点访问了:如果个人电脑在内网,使用服务器内网ip的22端口连接ssh,3389端口连接xrdp; 如果个人电脑在外网,则使用阿里云服务器ip的5022端口连接ssh,5023端口连接xrdp。
第二种方式是通用的,即使个人电脑在内网,也可以使用。同时,在手机、ipad等移动端上也很容易实施。
但有一个问题:阿里云服务器的带宽为3Mb,这意味着任何电脑从阿里云服务器下载数据的最高速度只有3Mb/8,为0.38MB每秒,或者约为400KB每秒。尽管上传数据至阿里云服务器的带宽更高(可能有100Mb),但通过tcp协议搭建的内网穿透连接,在任何情况下都需要同时受制于阿里云服务器的上传和下载两方面的带宽。
也就是说,根据木桶原理,在笔记本电脑和本服务器各自网络环境良好的情况下,前文中基于tcp协议搭建的穿透服务,最高的数据传输速度,只有400KB每秒。
这个速度,对于一般的ssh登陆、xrdp远程操作、jupyter notebook与vscode远程连接、一般的数据传输来说,基本够用了。
但有时也会出现上传或者下载大量数据的需求。这个时候,400KB每秒的速度就显得有些吃力了。解决的办法是在frp里面添加基于xtcp协议的点对点服务(即为隧道,或俗称“打洞”)。
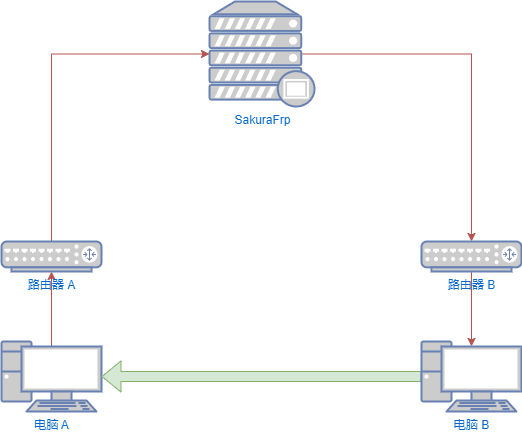
打洞的原理如上图所示。原先基于tcp协议的frp穿透,工作原理如红色箭头所示,所有的传输都需要通过阿里云服务器中转。而基于xtcp协议的frp点对点穿透,工作原理如图中绿色箭头所示:阿里云服务器只负责让本服务器和笔记本电脑连接上,后面的数据传输不需要通过阿里云。
这样一来,每一个数据传输任务的带宽,就仅仅由笔记本电脑和本服务器所处的环境决定了,不再会受到阿里云3Mb带宽的限制。
需要做的事情:1. 阿里云服务器中的设置,不用更改。 2. 本服务器,需要在frpc.toml中添加基于xtcp协议的新服务。3. 笔记本电脑,需要安装frpc,并在frpc.toml中添加访问本服务器新添服务的信息。
第一步 在上文设置好的本服务器/etc/frp/frpc.toml文件末尾添加下面信息:
1 | ## 增加点对点穿透模式,供个人电脑与本服务器间传输文件时使用 |
第二步 笔记本电脑(mac, linux, windows均可,去frp官网下载对应版本就行)的frpc.toml文件设置:
1 | ## 这部分的配置,根据阿里云服务器上/etc/frp/frps.toml 中内容设定 |
第三步 在笔记本电脑上启动frpc,成功后就可以通过127.0.0.1:9997端口ssh连接本服务器,或者通过127.0.0.1:9998端口xrdp连接本服务器。
提示:对于笔记本电脑,在mac下可以将frpc -c /etc/frp/frpc.toml之类的命令写入.csh文件(linux同此理);在windows下可以将D:\Programs\frp/frpc.exe -c D:\Programs\frp/frpc.toml之类的命令写入.bat 文件。这样需要启动frp打洞连接时,只需要点击文件执行即可,不用每次都去终端输入命令。
因为用的少,对于笔记本电脑上的frpc,不建议建立开机启动的服务。
总结一下两种frp反向代理方式的区别。以从笔记本电脑连ssh接本服务器为例:
- 基于tcp的穿透,是通过连接
[阿里云ip]:5022继而连接本服务器的127.0.0.1:22,且连接中所有传输都要通过[阿里云ip]:5022中转。 - 基于xtcp的穿透,是通过连接笔记本电脑的
127.0.0.1:9997继而直接连上(尽管确认建立连接时需要云服务器确认一下)了本服务器的127.0.0.1:22,且后续的数据传输都是两个设备之间直接进行,不需要云服务器中转。
另外,有趣的一点是,当一台电脑成功开启了隧道,就可以自动为所在局域网下其他设备打洞:如果家里有一台笔记本电脑成功开启了隧道,那么路由器下的所有其他设备(即使没有安装frpc的),都可以通过[笔记本电脑局域网ip]:9997和[笔记本电脑局域网ip]:9998端口分别对本服务器进行ssh和xrdp访问。
下图为当笔记本电脑和本服务器处于同一路由器下的测试结果:
下图为当笔记本电脑处于电信宽带下、本服务器处于移动宽带下的测试结果:

可以看到,想较普通穿透下的400KB下载速度,点对点穿透下的下载速度达到了3.8MB每秒,已经达到了普通宽带网络的上行带宽(一般家庭宽带的上行速度,只有30Mb,想要解锁上行带宽,往往需要额外付费)。
由此可以推断,如果笔记本电脑在家里(下行带宽1000Mb,上行带宽30Mb),本服务器在教育网(下行、上行带宽均为100Mb),那么通过xtcp隧道上传数据至本服务器的速度约为3.5MB/秒,而从服务器下载数据的速度约为12MB/秒。
至此,frp穿透设置全部完成:总结一下,以ssh和xrdp为例,有两种穿透方式:
- 在任何终端设备上,基于tcp的穿透,通过
[阿里云ip]:5022端口连接ssh,通过[阿里云ip]:5023端口连接xrdp。 - 在安装了frpc的终端设备上,在成功运行frpc,开启隧道前提下,基于xtcp的穿透,通过
127.0.0.1:9997端口连接ssh,通过127.0.0.1:9998端口连接xrdp。
经验:我发现,在任何情况下,使用rsync命令,都可以把所在网络的上行带宽跑满,而sftp代理软件会慢一些(慢了将近30%),所以,以后如果要上传较大的文件或文件夹,还是尽量自己手动rsync。
2024/08/13更新:本服务器搬去教育网后,打洞失败。这是因为教育网的NAT type是对称型(symmetric),当本服务器放在学校时,想要在校外打洞成功,笔记本所处网络NAT必须是全锥(Full Cone)型才可能。但大部分宽带网络NAT为端口受限型(Port-restricted)。因此,目前无法使用xtcp协议连接处于教育网的本服务器,只能使用tcp方式来进行穿透。
3.6 系统备份
4. 常用计算软件安装
4.1 Anaconda安装
我们先从Anaconda官网(如果网速受限,也可去清华镜像或者阿里云镜像)下载安装包:Anaconda3-2024.06-1-Linux-x86_64.sh。
接下来,去本服务器安装上面下载的文件 :
bash Anaconda3-2024.06-1-Linux-x86_64.sh
4.1.1 添加anaconda路径及自动初始化选项
用户登陆后,还需要在终端输入下面的命令才可以使用conda:
1 | export PATH="/usr/local/anaconda3/bin:$PATH" |
上面的命令会在退出ssh时失效,为了免去每次登陆都要输入该命令的麻烦,可将上面的命令写入.bashrc文件的最后一行(这是一个位于用户home目录下(~/即$HOME/)、每次登陆都会自动运行的shell脚本隐藏文件):
1 | echo 'export PATH="/usr/local/anaconda3/bin:$PATH"' >> ~/.bashrc |
退出后再次登陆,终端输入which conda验证路径已经添加。
同时,首次启动conda环境后,该软件还会修改automatically initiate设定,让用户每次登陆后都自动进入conda的默认环境,标志就是登陆后的用户名左边会出现(base)。如果要禁用此功能的话,就在终端输入:
conda config --set auto_activate_base False
相应地,如果要启用conda的automatially initiate设定,想在登陆时自动进入base环境,则(在进入conda环境后)输入:
conda config --set auto_activate_base True
退出后重新登陆,验证上文中的True或False设定生效。
4.1.2 设置写入权限用户组
普通用户能执行conda命令,但无法安装packages,新建conda环境。在读(r)和执行(x)权限基础之上,我们还需要对特定用户开通在anaconda安装目录下写入(w)的权限。
接下来,我们将anaconda安装至根目录/下面,以便所有用户使用(尽管后面服务器使用过程中,每个普通用户都可以在自己的/home目录下独立安装miniconda或者anaconda。
关于这点,anaconda官网给出了各个操作系统下的实现方法。
对linux而言,方法就是创造一个新的用户group,将其修改为/usr/local/anaconda3路径的用户组,并让组内成员拥有rwx权限。相应的解释,在后文处有解释。
1 | sudo groupadd admin_group |
最后,使用命令ls -ld /usr/local/anaconda3查看设置是否生效:

4.1.3 更换anaconda国内镜像源
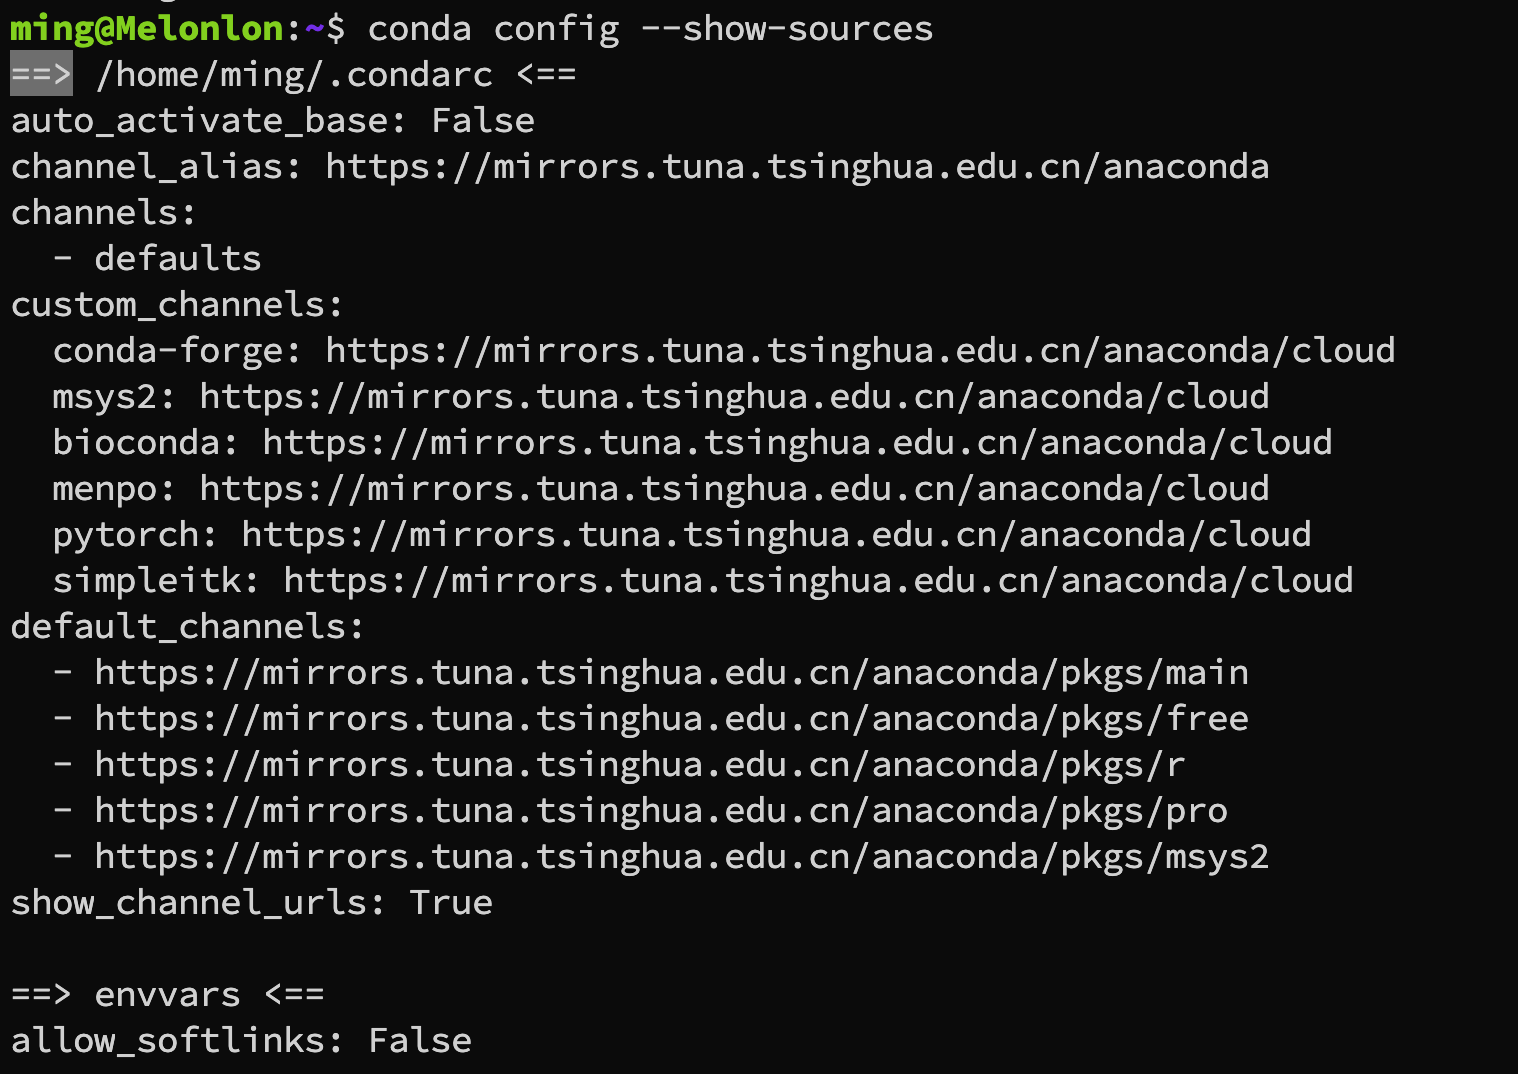
还剩最后一步,考虑到本服务器以后主要连接教育网,更换清华镜像:
用户登陆后,打开conda配置文件:nano ~/.condarc
根据清华anaconda镜像官方说明,可添加以下内容并保存:
1 | channels: |
验证是否更改成功。conda config --show-sources
得到下面的信息:
4.2 CUDA安装
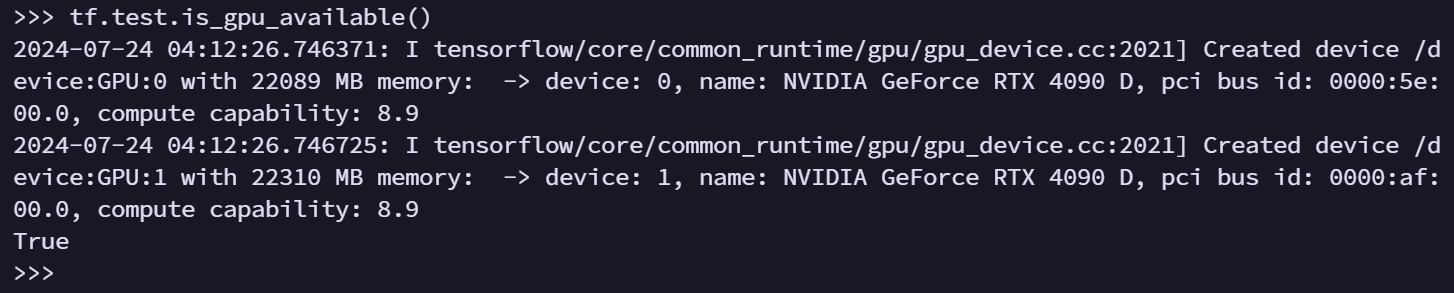
在终端中输入nvidia-smi查看到和当前nvidia driver(550版本)适配的CUDA版本为12.4 。
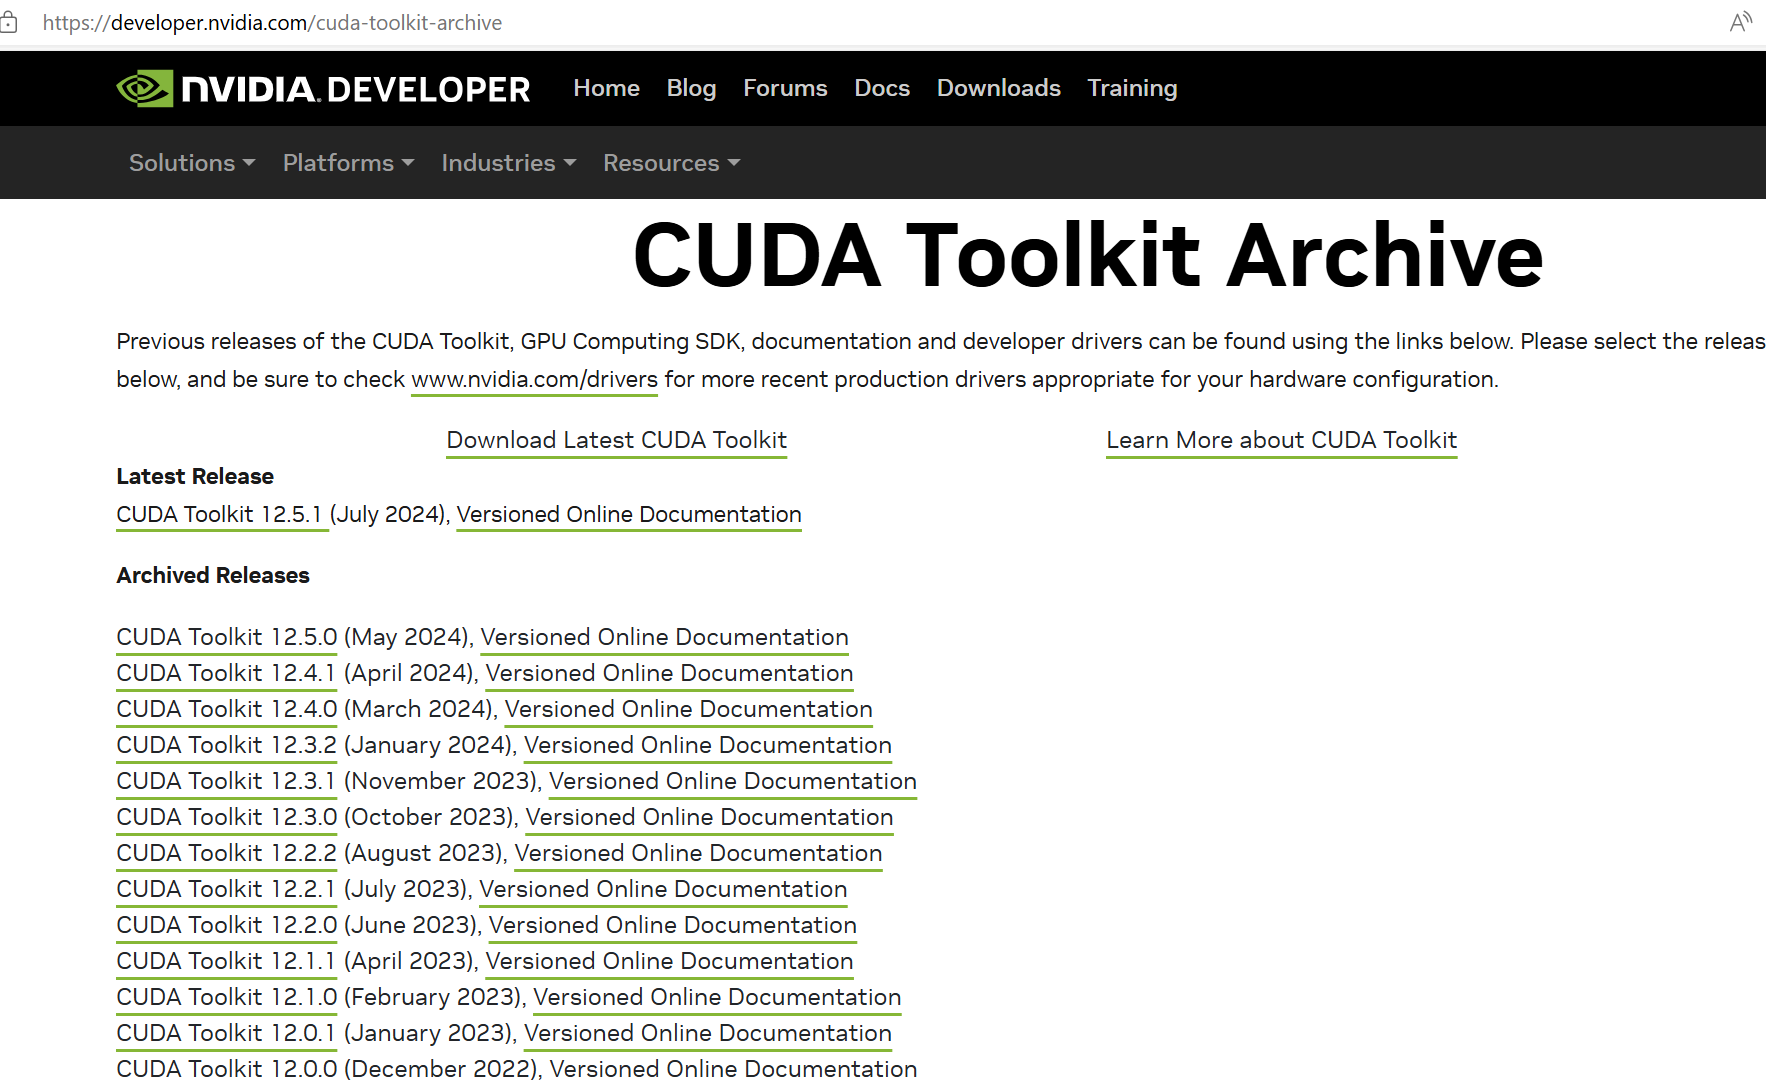
首先,去CUDA的官方下载页面,选择CUDA版本12.4.1。
然后再进一步选择合适的安装程序和版本。
以本服务器为例,由于下载页面没有出现ubuntu24.04的选项,我们选择x86_64下ubuntu22.04的runfile替代。
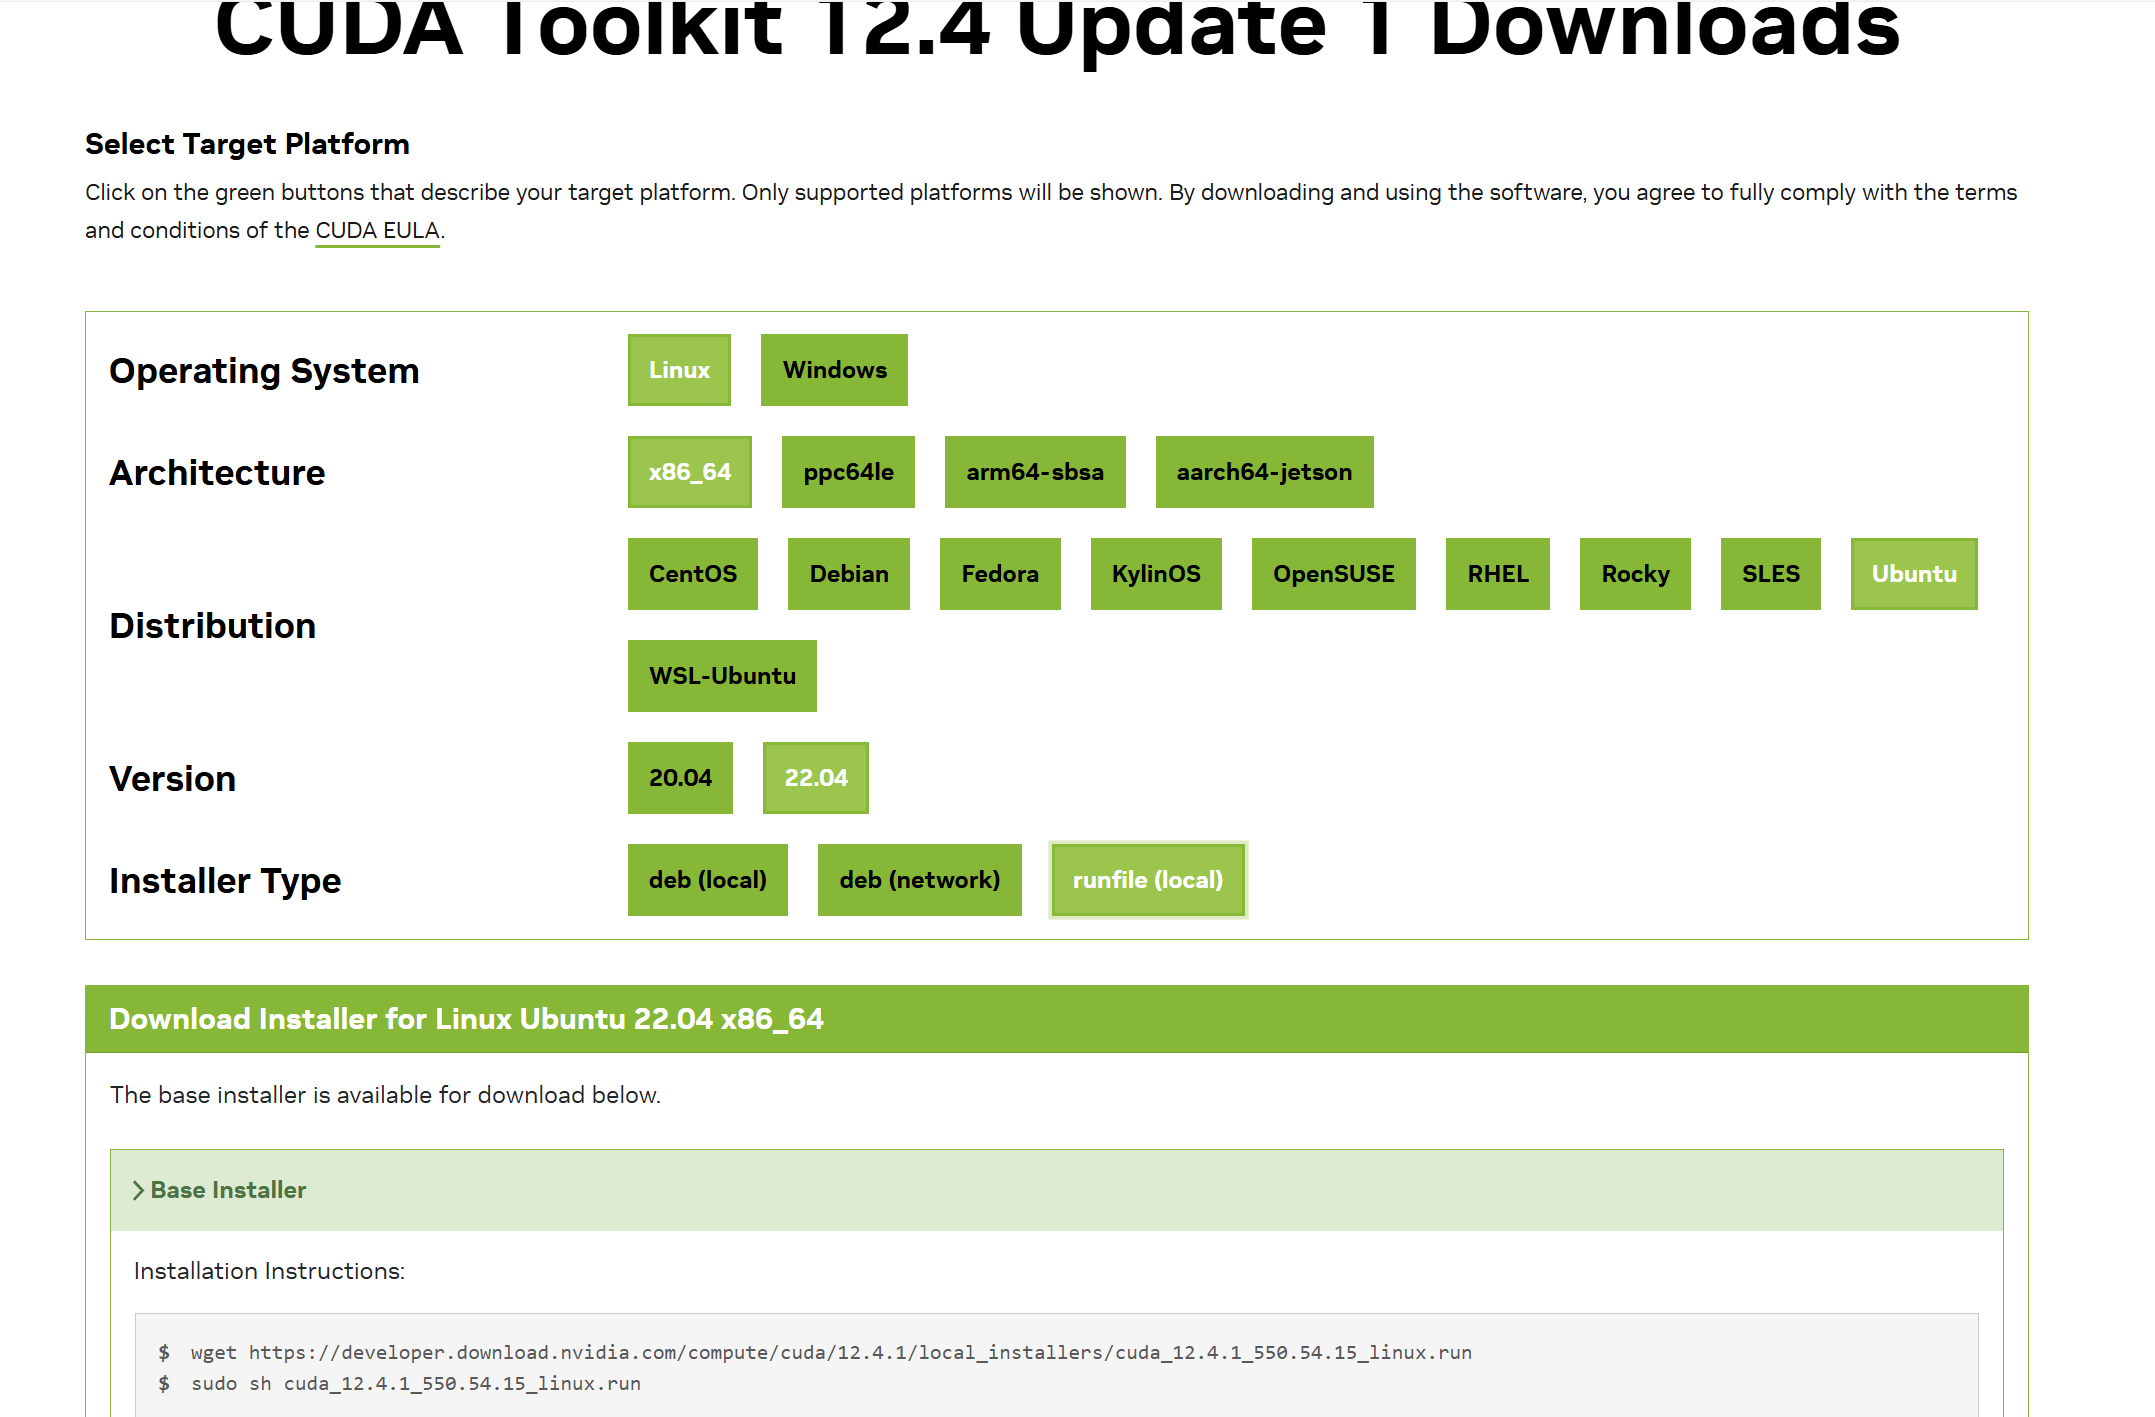
选好CUDA版本后,网页下方就会出现安装方式:
1 | wget https://developer.download.nvidia.com/compute/cuda/12.4.1/local_installers/cuda_12.4.1_550.54.15_linux.run |
在本服务器终端直接输入命令即可。
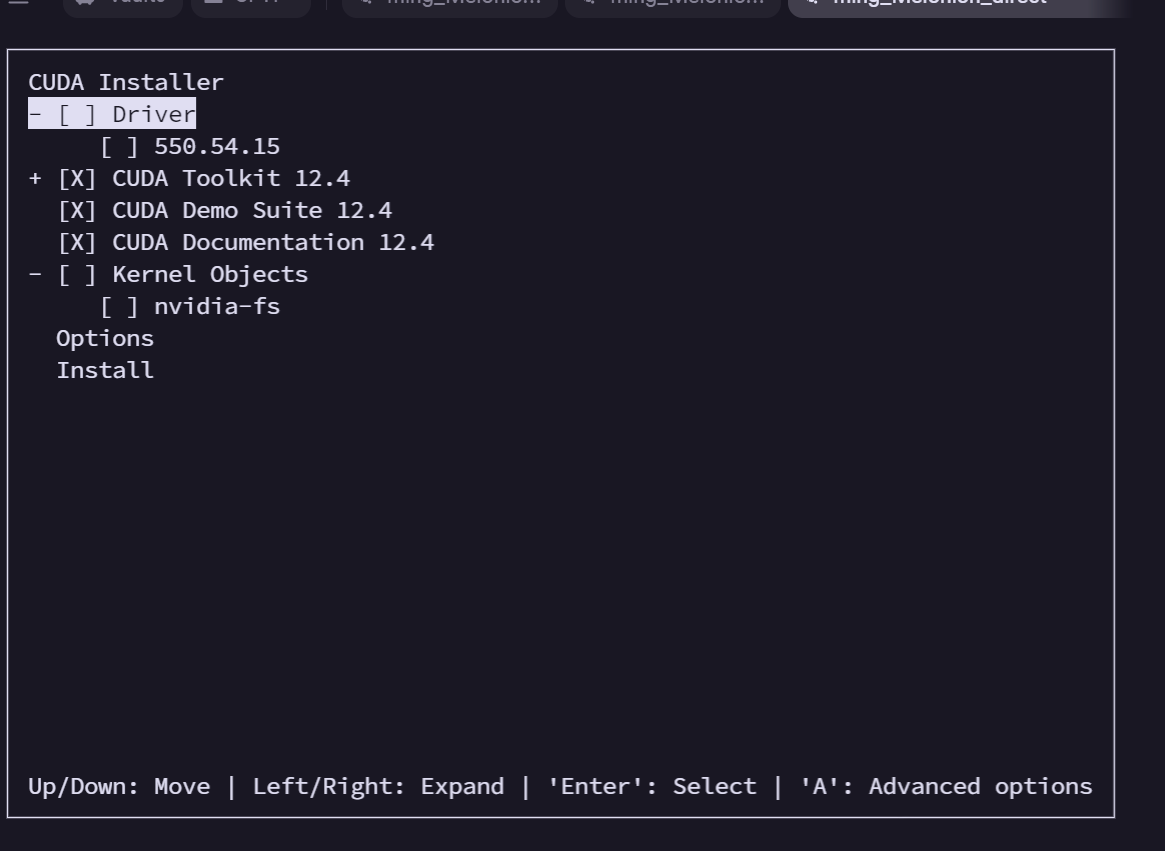
因为之前已经装过显卡驱动。CUDA安装过程中注意取消勾选Driver选项,以避免重复安装显卡驱动导致安装失败,如下图所示:
总结一下:安装Nvidia driver和CUDA的顺序,是首先在ubuntu选择最新的稳定版本nvidia驱动安装,再根据该驱动查到的信息决定CUDA版本(本例中是12.4),继而下载、安装CUDA。
万一装错了CUDA版本,可以按照官方建议,这么删除:
1 | sudo apt-get --purge remove "*cublas*" "*cufft*" "*curand*" "*cusolver*" "*cusparse*" "*npp*" "*nvjpeg*" "cuda*" "nsight*" |
接下来,打开文件nano ~/.bashrc,并在末尾写入:
1 | export LD_LIBRARY_PATH=$LD_LIBRARY_PATH:/usr/local/cuda/lib64 |
激活环境变量:source ~/.bashrc
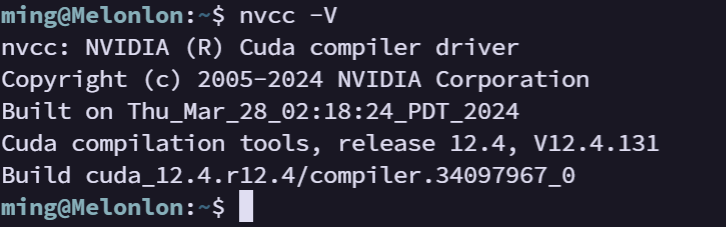
终端输入命令nvcc -V,确认CUDA安装成功:
4.3 cuDNN安装
去cuDNN官网下载页面,根据CUDA版本号12.4确定与之适配的最新cuDNN版本应v.8.9.7。
(先登录nvidia账号)选择Local Installer for Linux x86_64 (Tar)下载安装程序cudnn-linux-x86_64-8.9.7.29_cuda12-archive.tar.xz。
在本服务器终端安装:
1 | tar -xf cudnn-linux-x86_64-8.9.7.29_cuda12-archive.tar.xz |
再设置CUDA的用户组权限(/usr/local/cuda权限默认是777,不用提升)
1 | sudo chgrp -R admin_group /usr/local/cuda-12.4 |
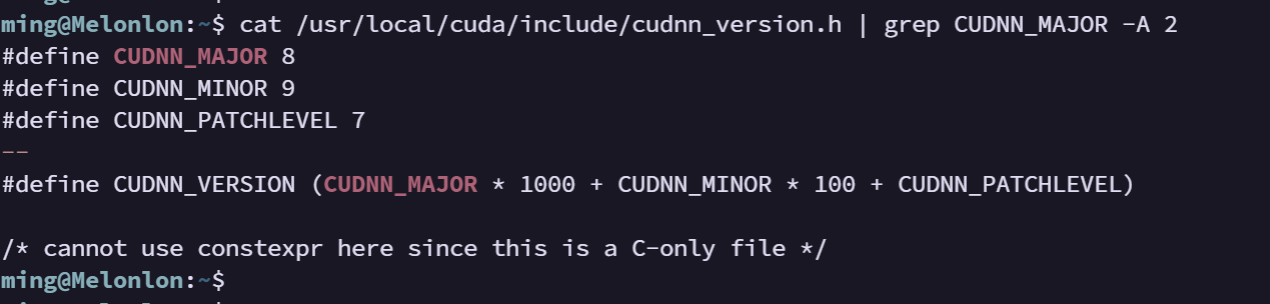
在终端输入’cat /usr/local/cuda/include/cudnn_version.h | grep CUDNN_MAJOR -A 2’,确认安装成功。可以看到,cuDNN的版本号为8.9.7。
4.4 Pytorch与Tensorflow安装
4.4.1 CUDA与CUDA Toolkit
NVIDIA CUDA (Compute Unified Device Architecture) is a parallel computing platform and API that allows developers to use the powerful GPUs produced by NVIDIA for general-purpose computing. CUDA is the underlying software and hardware architecture that enables this parallel processing capability.
The NVIDIA CUDA Toolkit, on the other hand, is a software development kit (SDK) provided by NVIDIA. It includes a compiler, libraries, debugging and optimization tools, as well as the CUDA runtime, which is the software layer that manages the CUDA-enabled GPUs.
In summary:
- CUDA is the fundamental GPU-accelerated computing platform developed by NVIDIA.
- The CUDA Toolkit is the SDK that provides the tools and libraries needed to develop applications that leverage the CUDA architecture.
4.4.2 安装Pytorch
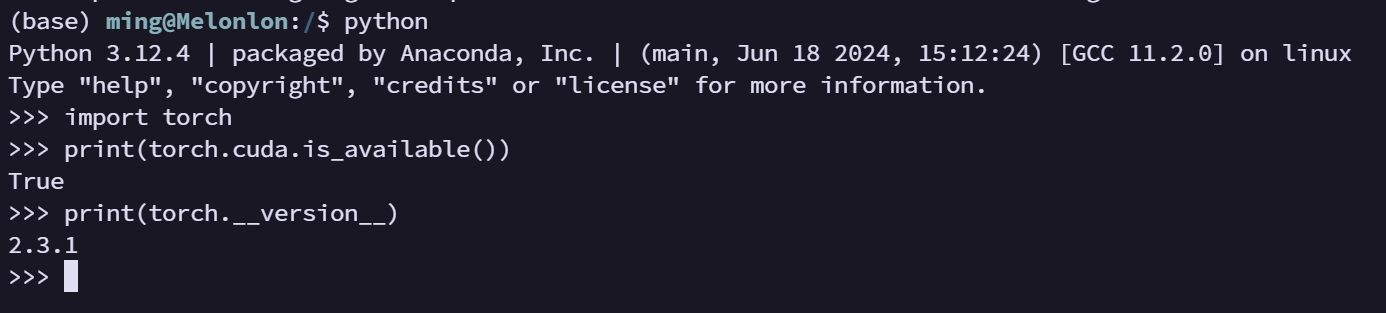
在Pytorch主页看到,截至2024年7月,Pytorch stable(2.3.1)版只支持到CUDA12.1,我们就根据官方给出的命令,在默认的base虚拟环境中安装此版本的torch。待日后官方发布更高CUDA版本的支持了,我们可再考虑更新。

1 | ## 如果设置了登录自动进入base环境,则不需要下面这行 |
中途输入y,确认安装。
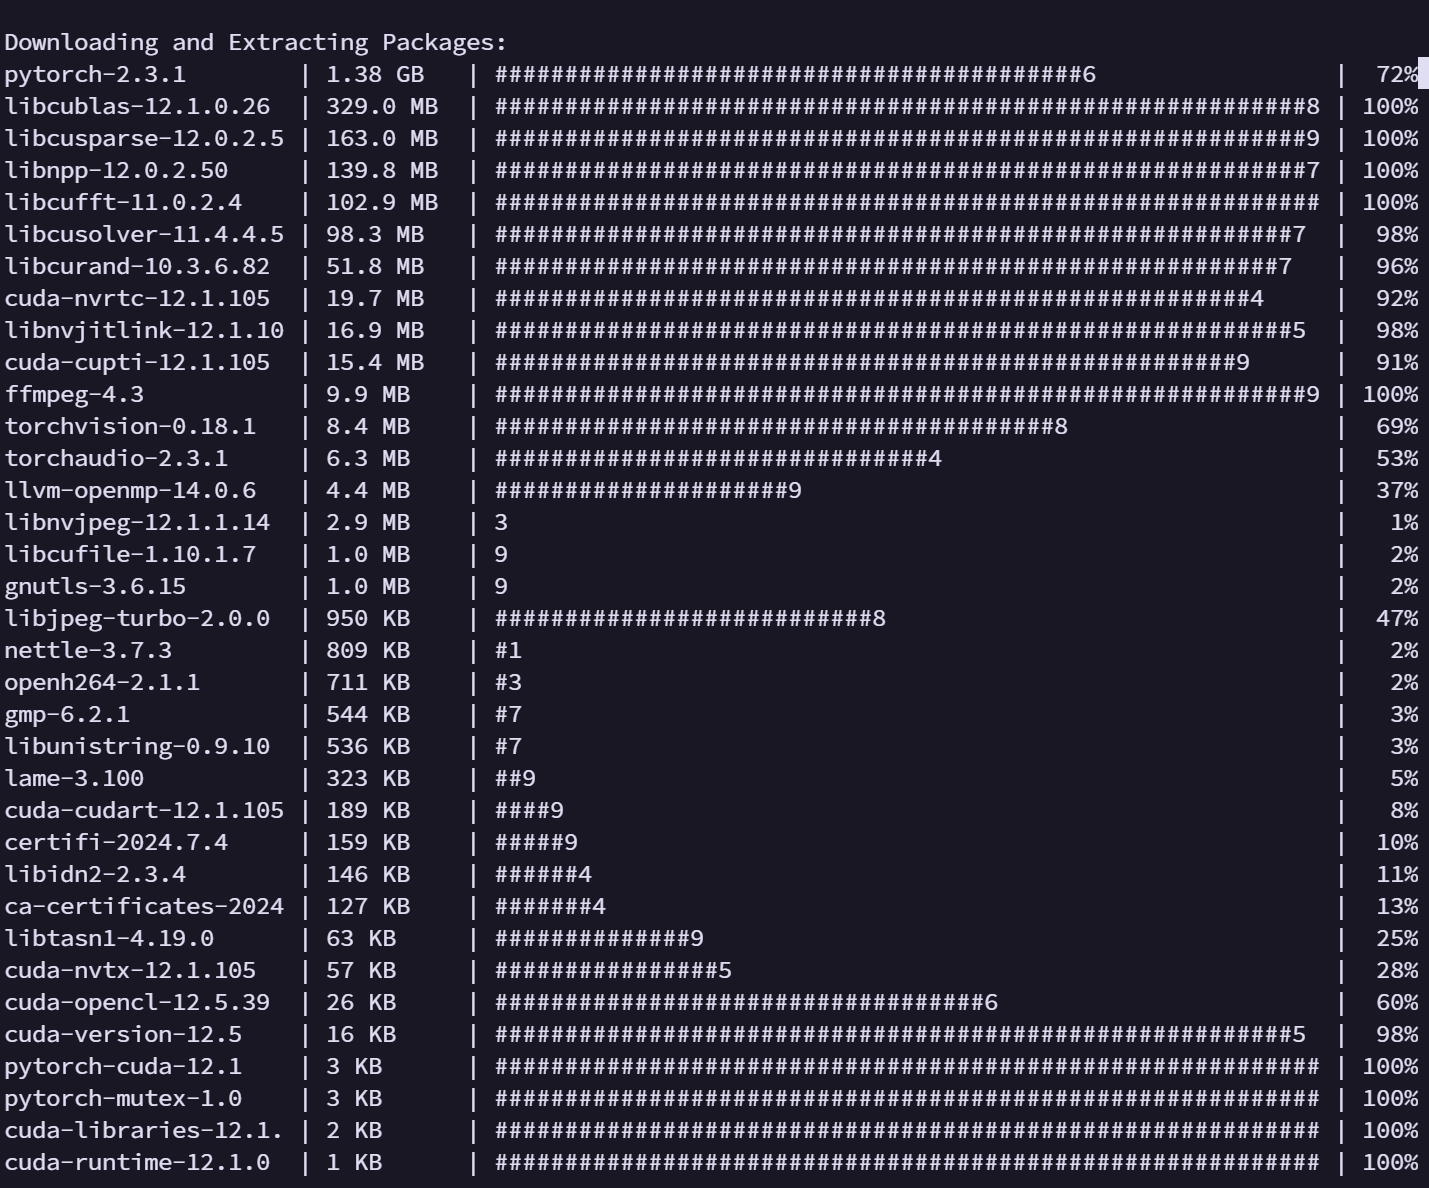
等待一会后(镜像换成清华后,下载速度很快),安装结束。在base环境中进入python,确认pytorch安装成功:
4.4.2.1 测试一个训练文件
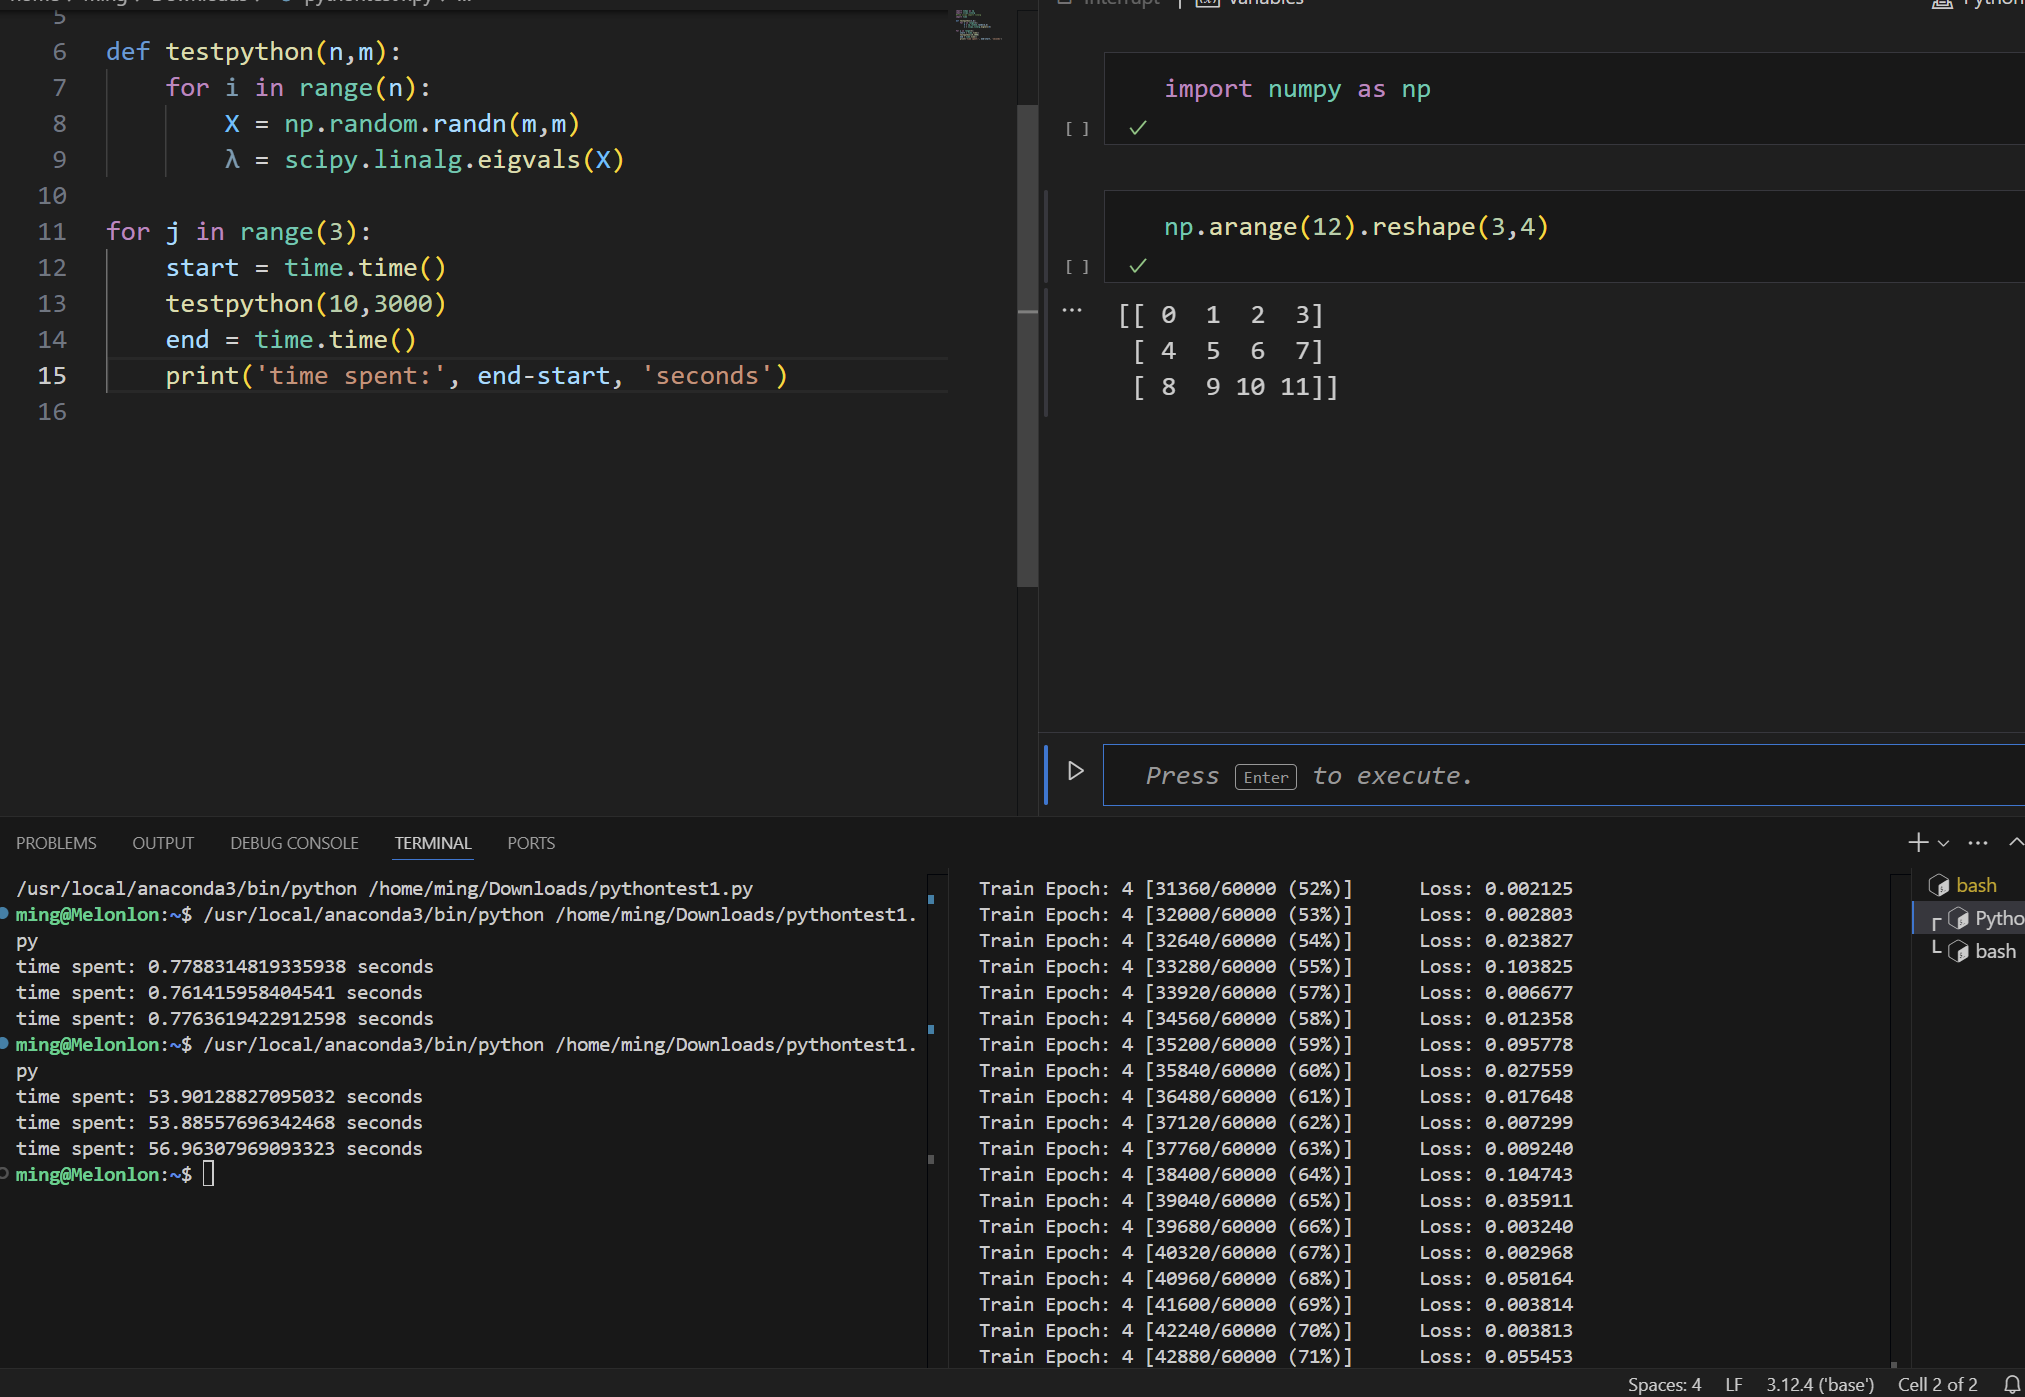
接下来,我们基于MNIST手写数字数据库测试一个训练模型。
将脚本写入MNIST_train_test.py,在本服务器conda base环境中运行。
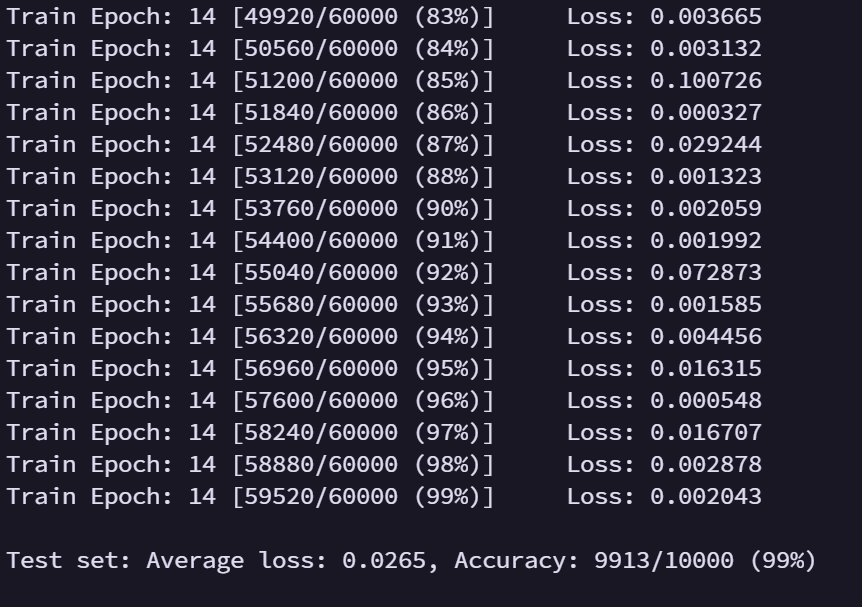
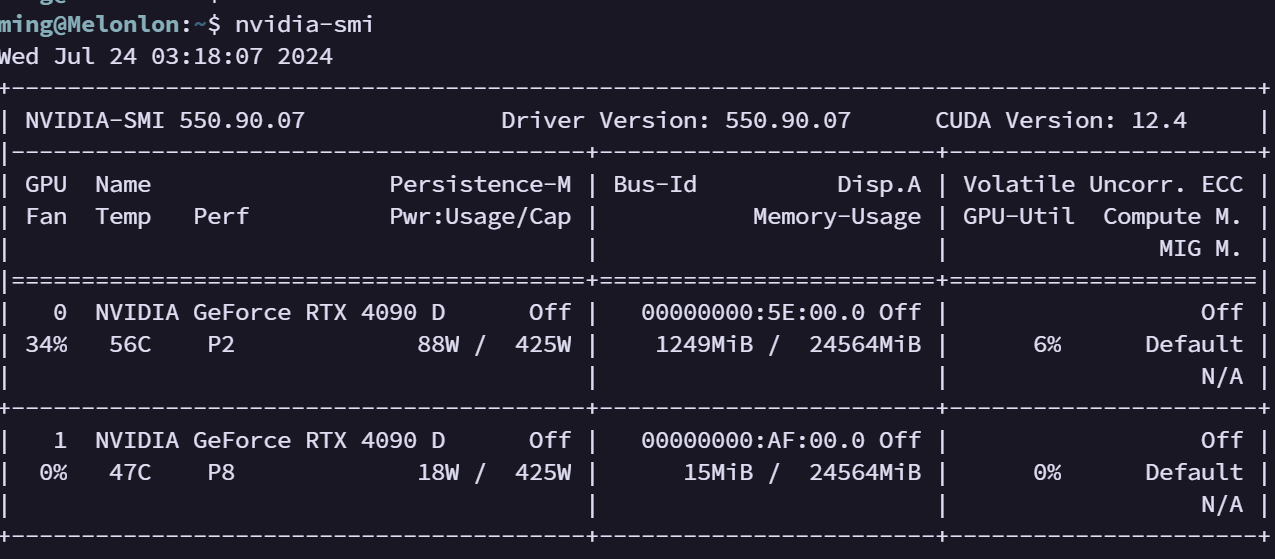
上面两张图告诉我们,训练在一个4090D显卡(编号为0的那块显卡)上进行。过程中GPU风扇速度达到了34%,显存使用率约5%;在平时,这两项数据均接近0。
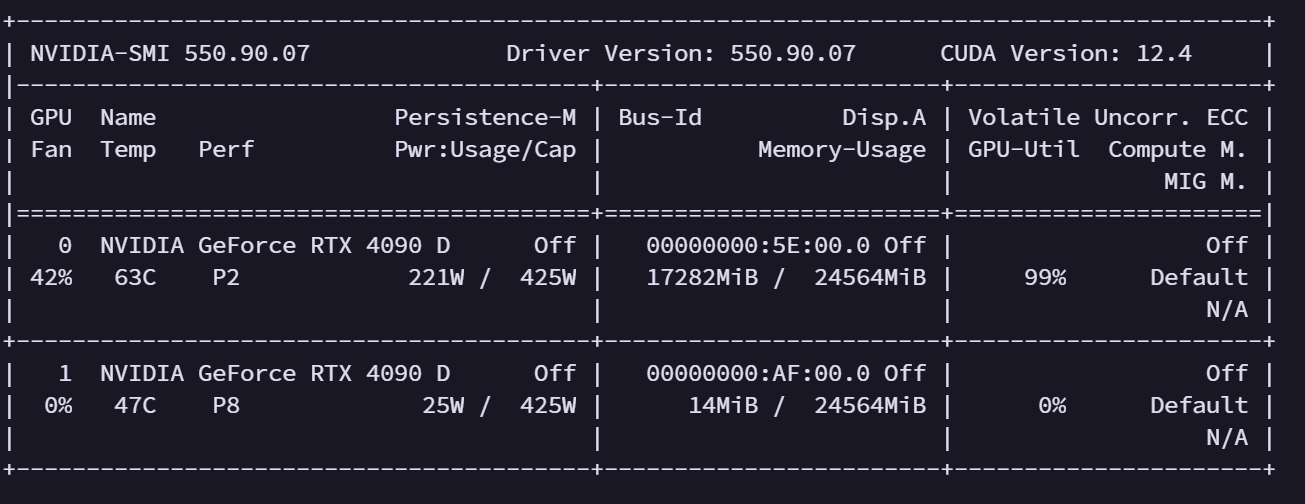
同时运行15个上述训练程序:
4.4.3 安装Tensorflow
目前我们base环境中的python版本为3.12,而根据Tensorflow官网的说明Tensorflow只适配3.6-3.9版python。

因此我们可以新建一个3.9python的虚拟环境,并根据官网推荐,在虚拟环境中使用pip安装tensorflow2.5版:
1 | conda create -n ts_env pip python=3.9 |
在ts_env环境下检确认安装成功:
1 |
|
4.5 Matlab安装
Matlab的安装很简单。
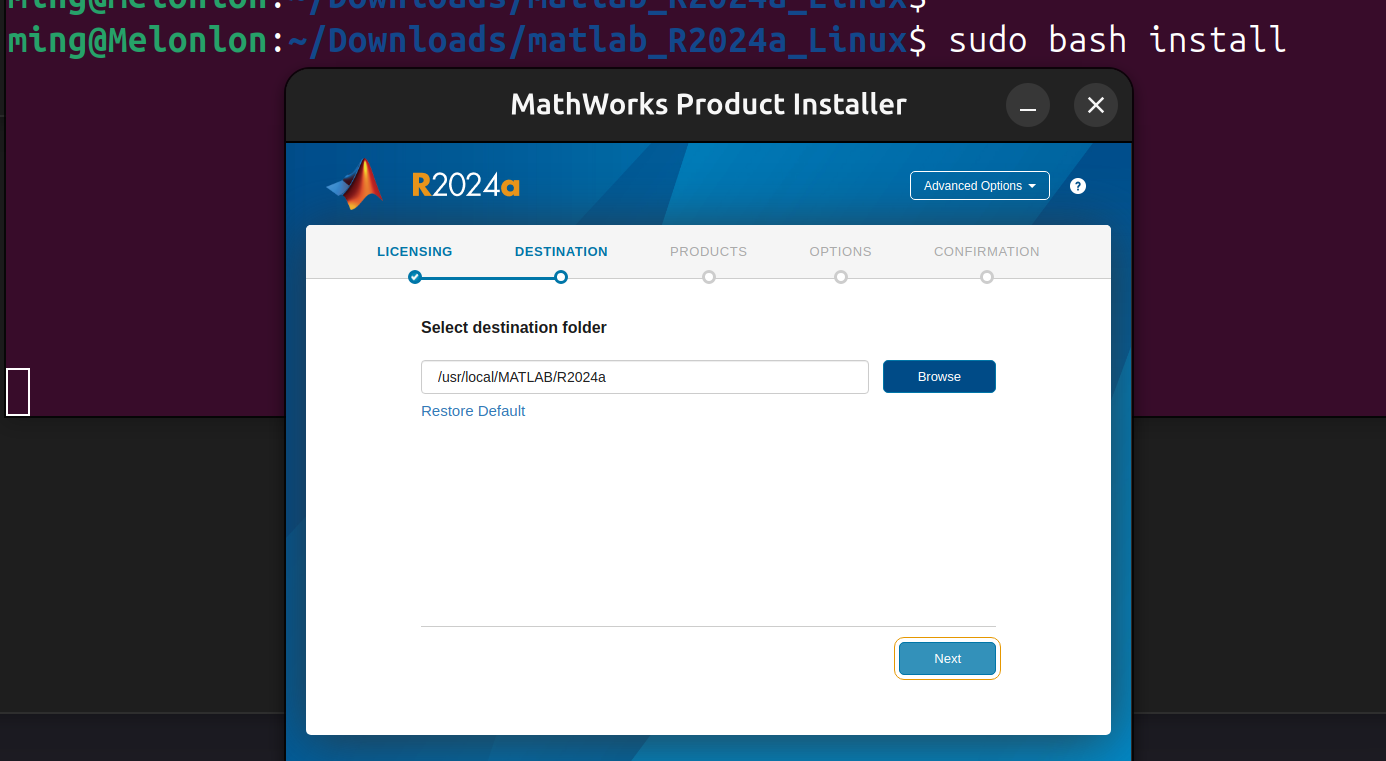
第一步 去mathworks登陆教育网账号,然后下载linux版本的安装程序。
第二步 在本服务器上将安装程序解压后,在解压路径下运行install脚本。注意,这里要使用sudo来运行,否则无法将matlab安装至根目录。安装过程中输入教育网账号密码,选好工具包后即可在线安装。
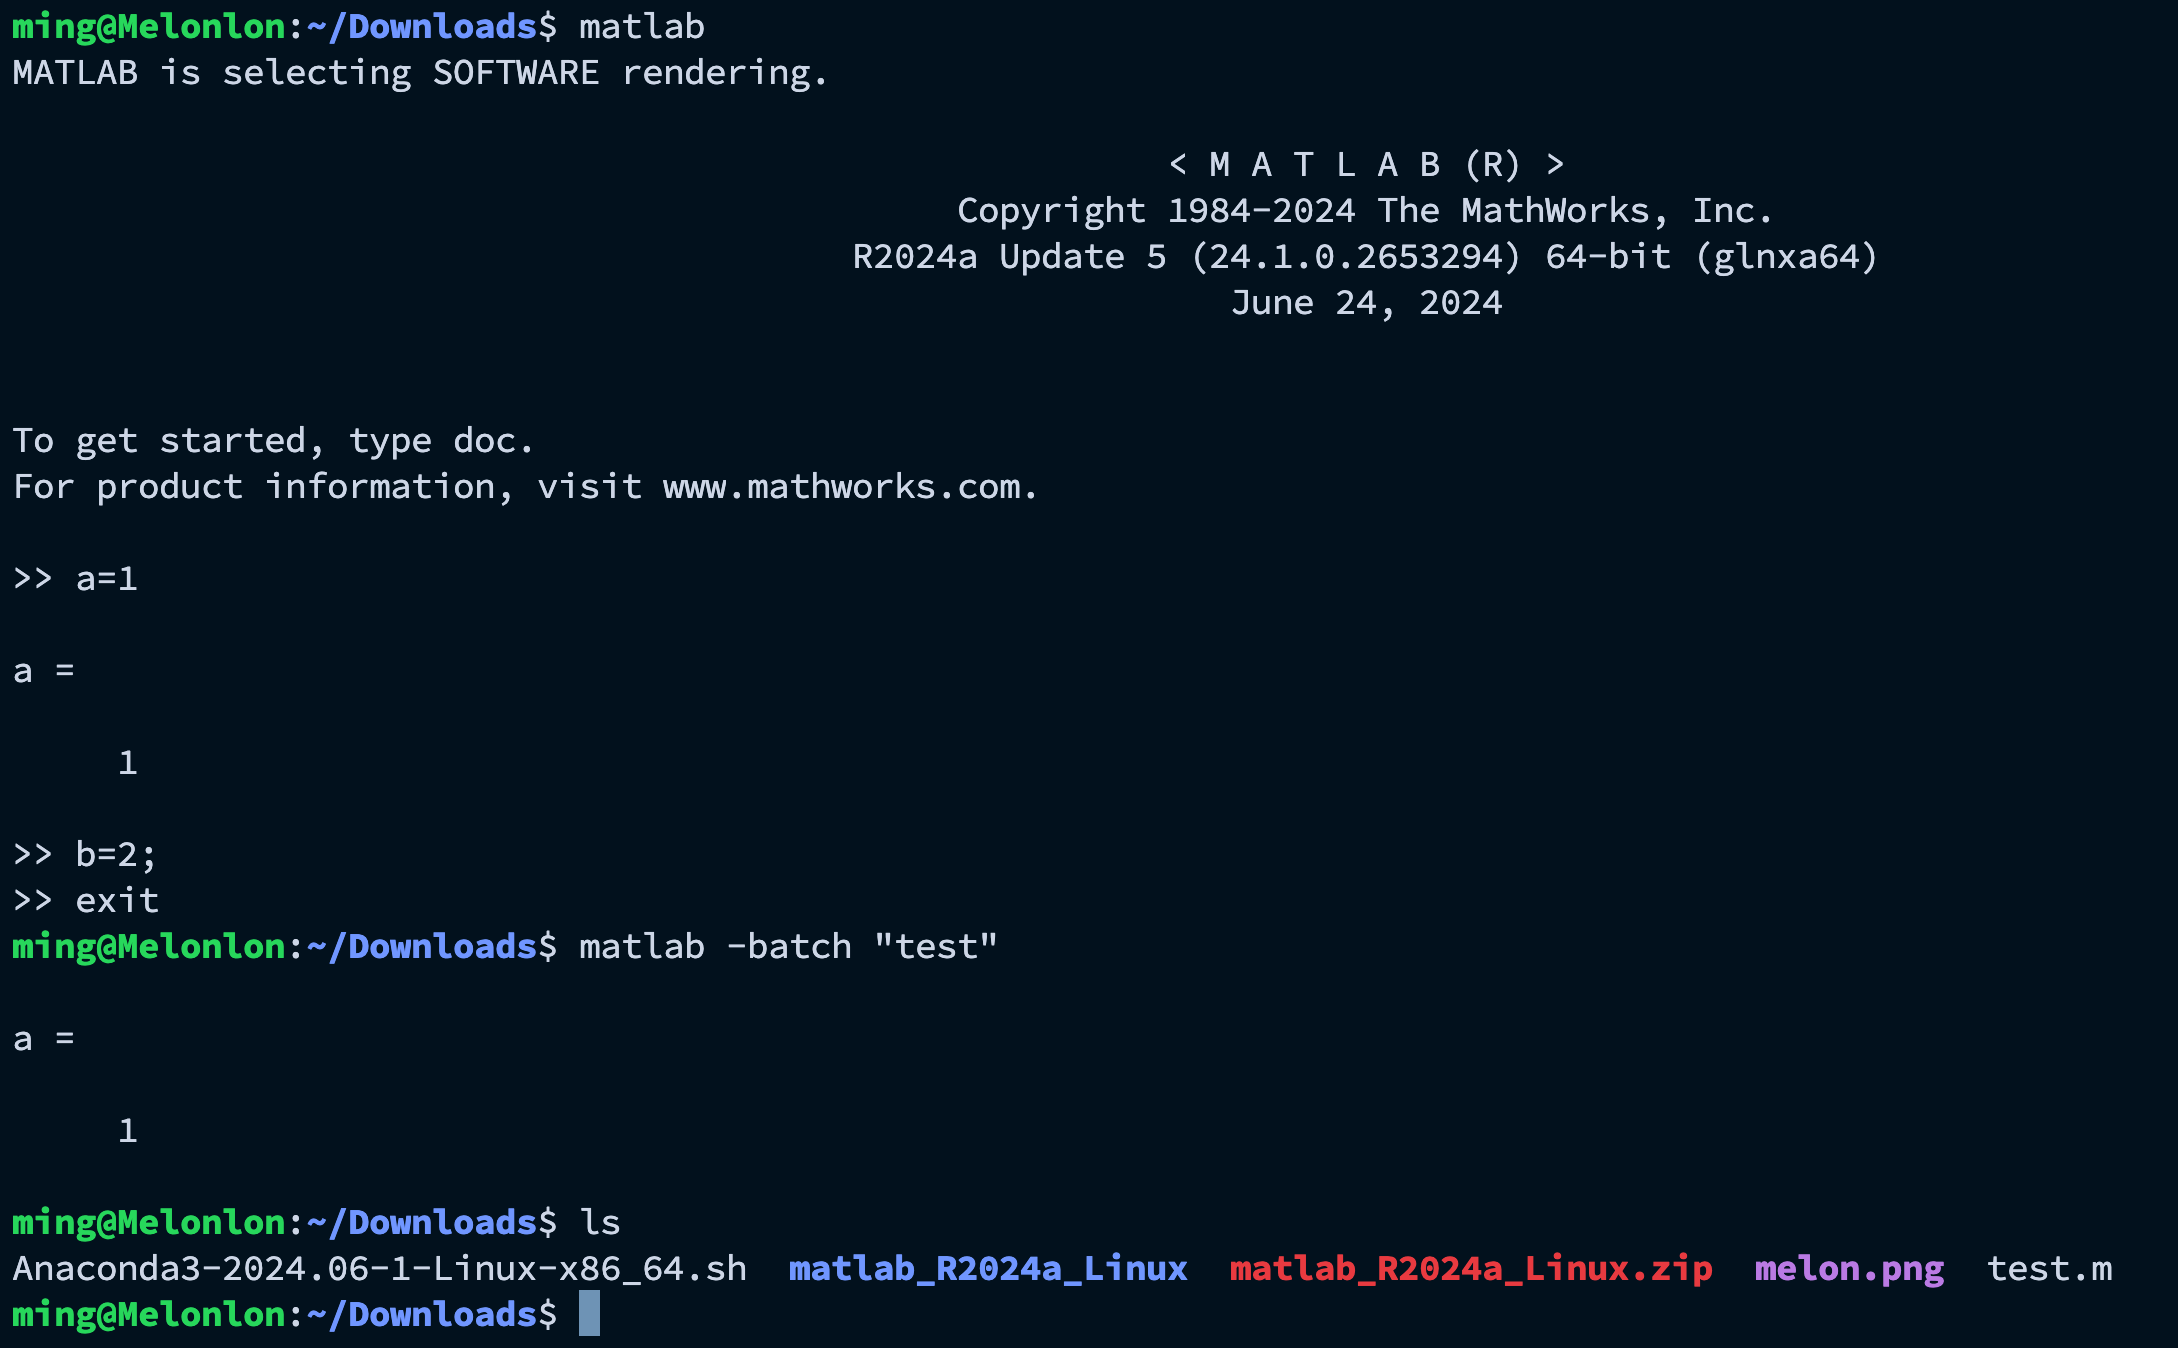
测试一下,matlab可用:
4.6 配置VS Code Remote SSH
接下来,我们配置一下VS Code的Remote SSH功能,使得用户能通过远程SSH方式在服务器上编辑、调试、运行程序。
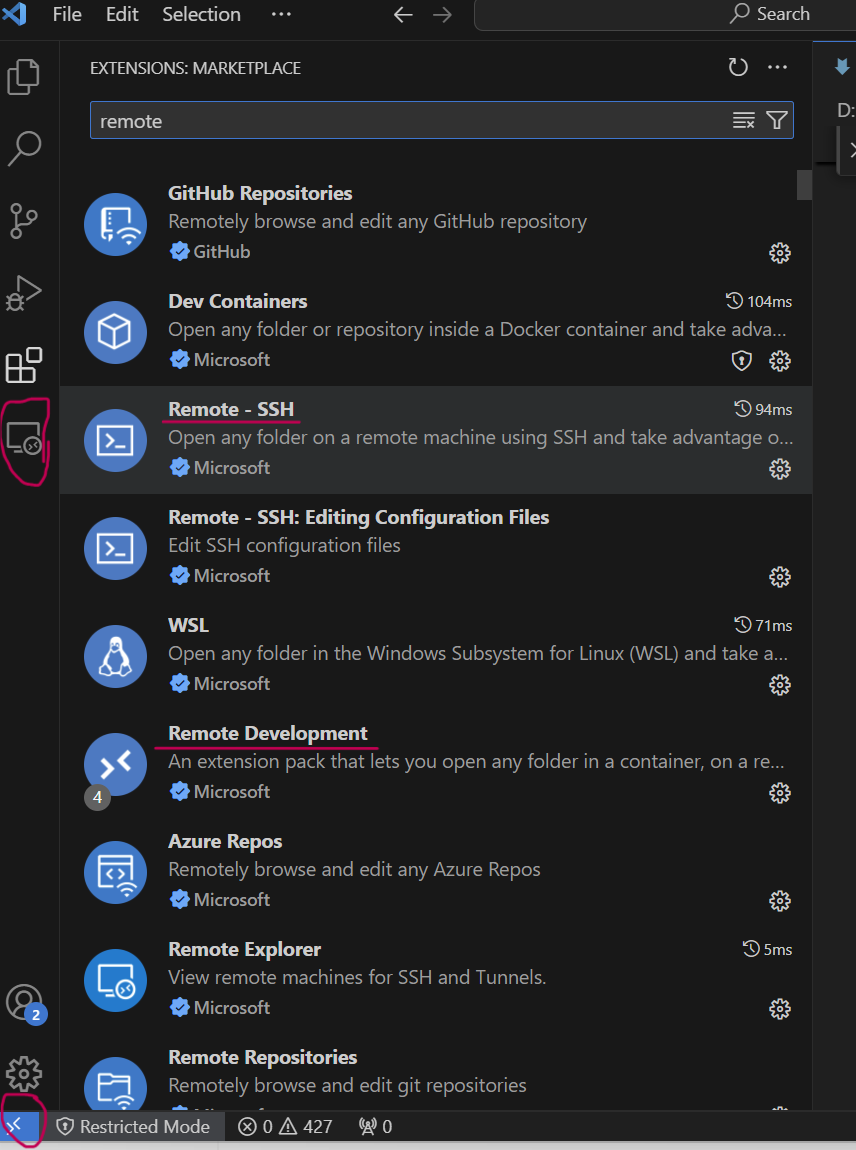
第一步 在本地端安装好VS Code后,进入软件的extensions界面,搜索remote-ssh并安装,或者直接安装 remote development 。后者是多个远程工具包的集合,包括了前者。
安装成功后,vs code的界面左侧栏就多出了remote explorer图标,如下图所示。点进去就可以在remote-ssh相应位置进行添加、编辑配置等操作了。同时,vs code界面的做下脚,多出了一个蓝色的远程连接按钮,以后就可以通过观察这里知道远程连接状态,或者通过点击这里实现连接、断开连接等快捷操作(退出remote界面前最好断开,否则下次打开VS Code时会自动重新连接)。
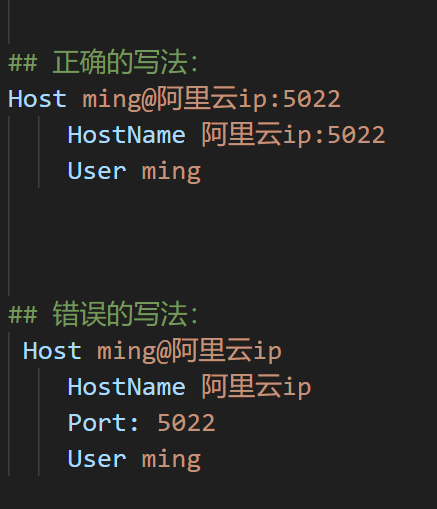
第二步 修改remote-ssh配置文件。通过软件左侧按钮进入远程功能,选择添加新ssh后,在提示的命令窗口输入诸如ssh ming@阿里云ip:5022 之类的命令,在弹出的配置文件保存选项里面,默认选择第一个即可。
接下来在点击左侧remote列表的ssh设置按钮,打开提示的配置文件,进行编辑。这里有一个坑:由于大多数情况下,我们是通过frp穿透连接的目标服务器。对于上文中的阿里云ip:5022部分,配置文件中默认转换成了Port 5022,可是经过测试,一旦有了这一行,连接的时候,就自动连接的阿里云主机的22端口,而不是连接至目标服务器。因此我们需要在配置文件中进行手动调整。如下图所示。
另外,配置文件中的Host要写成user@ip地址的形式,否则连接的时候,会自动以本地机器的用户名来连接。
第三步 连接remote-ssh即可。有时候可能会碰到前面以外推出后,再连接时报错的情况。此时在vs code界面上方搜索栏里面使用>remote-ssh:kill vs code server on Host或者>remote-ssh:uninstall vs code server on Host功能也许管用。
连接上remote-ssh后,目标服务器会自动在本用户目录下安装vscode-server,路径为`~/.vscode-server/。提示安装结束后,就可以使用vscode remote ssh功能了。
登陆的时候,默认会在搜索栏提示输入服务器密码(如遇到问题,可点开右下方提示查看细节)。而如果本机在终端已实现了免密ssh登陆(参见这里),则不需要输入密码即可remote ssh。
成功登陆后,可以打开目标服务器中的文件、文件夹,或者定义workspace等等。只要VS Code界面左下角图标显示远程连接正常,一切操作就好像在目标服务器本地进行一样,体验流畅丝滑。
同时,由于远程界面是依托目标服务器上的vscode-server进行的,如同在本地电脑上使用vscode一样,远程界面下,该安装的各类vscode插件,都需要再安装一遍。
例如打开服务器上的一个python脚本时,vscode会提示安装python extension。遵从系统建议选择安装即可。安装结束后,就可以自动识别系统中已有的python interpreter并进行选择了。点击右下角的python字样即可。一般情况下默认conda base即可,如下图所示。

在下图中,vscode 同时打开了四个窗口:一个python脚本编辑,两个terminal,一个python REPL。
注意,如果是刚进入remote ssh,打开一个terminal时,所处的环境就如同普通ssh登陆时,默认没有激活任何conda环境(相关设置见这里)。但如果前面已经通过运行python脚本或命令启动了conda环境(因为选择了base作为默认interpreter),那么terminal已处于conda环境下,尽管终端里面的命令行左边不会显示(base)字样。
4.7
5. 服务器维护杂项
5.1 修改ssh登陆欢迎界面
使用命令ls /etc/update-motd.d/查看ssh登陆的欢迎界面各个部分的定义文件:

例如要修改欢迎界面中的帮助说明,可以使用sudo权限修改下面文件:
sudo nano /etc/update-motd.d/10-help-text
再比如,如果要添加欢迎界面的字符画,可以考虑在/etc/路径下新建文件:
sudo nano /etc/hello.file
将网上生成的ASCII字符画直接复制粘贴进去上面的文件。
再把该文件读入header中:
先打开sudo nano /etc/update-motd.d/00-header ,再在文件末尾加上一行:
cat /etc/hello.file
保存退出后,重新登陆ssh即可看到位于header末尾的字符画。
5.2 管理user和group
-
用户:
sudo adduser test_user #添加用户
sudo addgroup test_group #添加用户组
sudo useradd -m username -s /bin/bash -g test_group #添加用户时制定群组、主目录名、和新账户的登陆shell
sudo passwd username #修改密码
sudo chfn -f 'test user1' 'test_user' #修改testuser的全名 -
用户组:
sudo adduser test_user test_group
sudo usermod -g test_group test_user #修改用户的组
cat /etc/group | grep 'test_group' #查看用户组下成员
groupmod -n newname oldname #修改用户组名称 -
将普通用户赋予管理员权限(上文中有另一种方法):
先:sudo chmod +w /etc/sudoers
再:sudo nvim /etc/sudoers -
删除用户:
sudo userdel -r test_user
5.3 修改用户密码策略
- 设置最短密码长度:
在sudo vim /etc/pam.d/common-password中寻找minlen赋值。 - 设置密码复杂度:
在sudo vim /etc/pam.d/common-password中寻找ucredit, lcredit, dcredit, ocredit的赋值,分别表示最少需要有多少个大写字母、小写字母、数字、标点符号。 - 设置密码过期时间:
在sudo vim /etc/login.defs中寻找PASS_MAX_DAYS部分各变量赋值。 - 强制用户首次登陆时修改密码:
设置新用户名和初始密码后,用下面命令修改该用户密码是在1970年1月1日更改的,这会使得当前密码立即到期,从而需要在下一次登陆时更改:
chage -d 0 test_user - 查看test_user的密码情况:
chage -l test_user
5.4 挂载磁盘及设置用户群组权限
5.4.1 格式化与挂载磁盘
以本服务器的RAID1磁盘为例,我们将此磁盘格式化(Ext4格式),命名为data_raid,并挂载(mount)到admin用户下某路径,使admin成为该路径的owner,这些设置以后还能更改。
上述目标,都可以很容易的在ubuntu图形界面实现:使用admin账号登陆后,进入Disks管理工具,选择对应磁盘,就可进行Parttitioning,Take Ownership,Mount(和Unmount)等操作。
同样地,这些目标也可以通过终端命令实现(已通过sudo fdisk -l命令看到磁盘的设备名称为/dev/sda):
1 | sudo fdisk /dev/sda #如果磁盘没有分区,才先执行此操作,否则直接进入后面格式化步骤 |
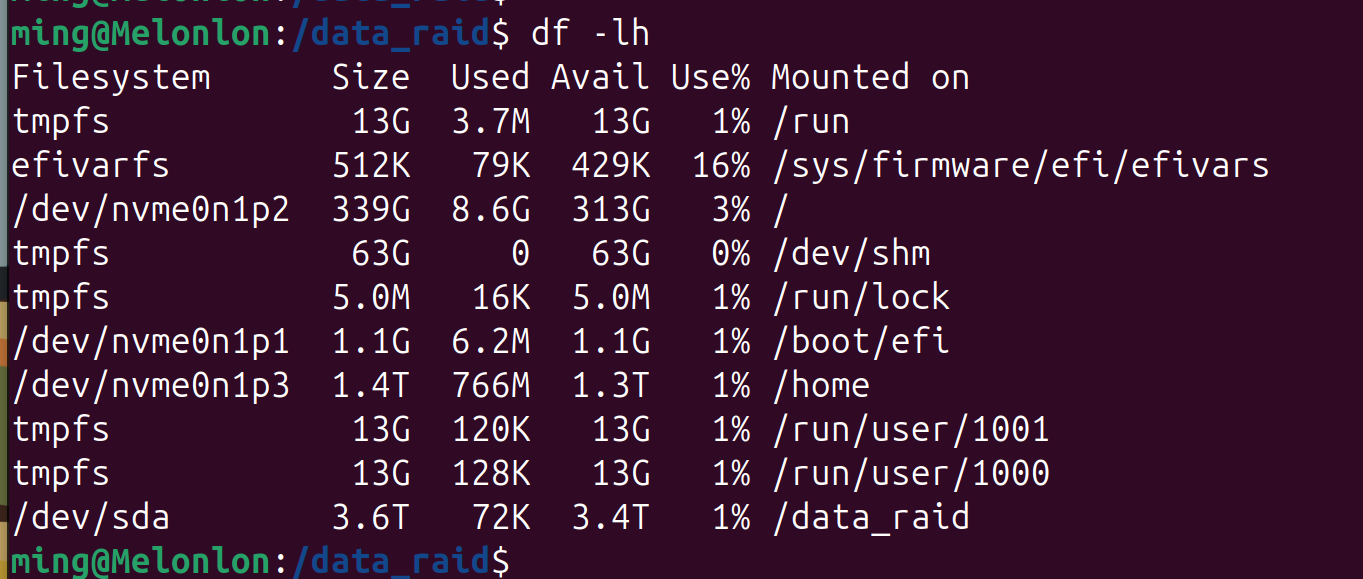
终端输入df -lh,可以看到磁盘已经挂载好了。
5.4.2 设置用户群组权限
本服务器已有足够系统盘空间供用户日常使用(\home分区为1.48T),因此挂载的data_raid磁盘只供部分用户存储重要数据,需要设置好用户群组权限。
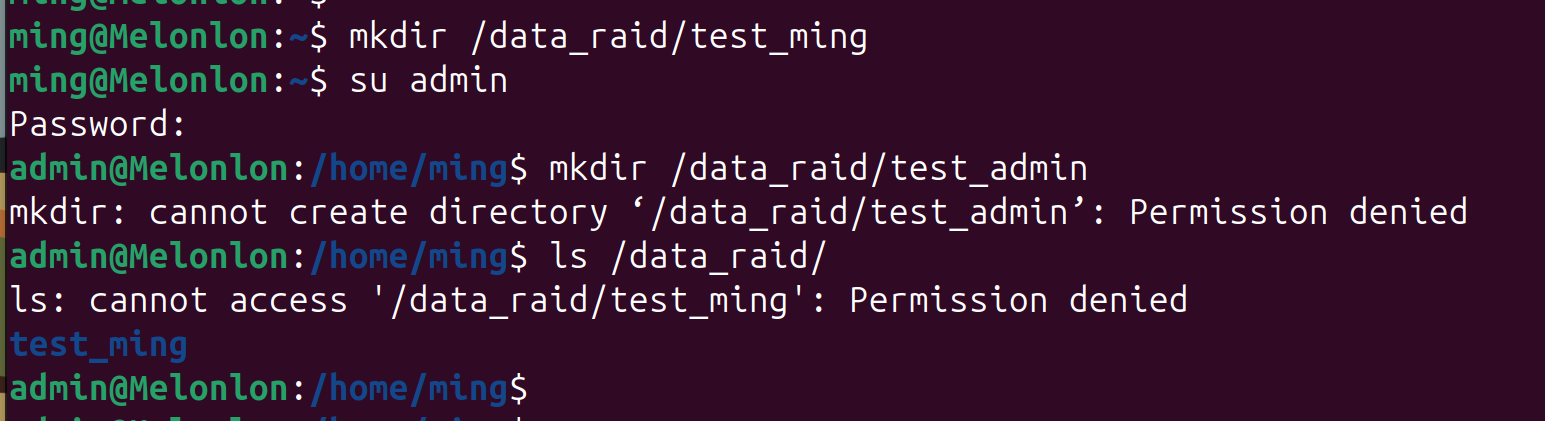
首先查看该磁盘的权限:ls -ld /data_raid

可以看到,该磁盘目前的owner是admin,group也是admin(每个用户默认是自己的群组成员),且权限状态为drwx------。其中d代表文件夹(-代表文件,l代表链接),不需要我们设置。
我们能更改的设置,是后面的9个字母,三个一组,共三组。这三组字母,分别对应owner,group,和other的权限。在这里,d后面接着的rwx表示owner有该文件夹的r(读)、w(写)、x(执行)的权限。而后面6个数位用短横线代替字母,表示目前group和other没有任何rwx权限。
我的权限设置目标是:让admin用户只有r权限,让data_raid_group群组中的用户有rwx权限,而other没有任何权限。也就是说我想要将drwx------改为dr--rwx---。
使用chmod命令更改时,我们赋予r权限4分、w权限2分、x权限1分。这样我们只需要注明对onwer、group、other的权限总分即可。在本例中,onwer权限4分、group权限7分、other权限0分。即需要设置chmod 参数 470。
使用下面命令修改权限:
sudo chmod -R 470 /data_raid
其中参数-R表示递归变更目录及子目录和文件的权限。
再查看该磁盘目前的权限状态,确认修改成功:

接下来,我们只需要将平时会使用磁盘的其他用户加入data_raid_group群组,并重新定义该磁盘对应的用户和群组即可:
1 | sudo addgroup data_raid_group |
验证路径权限更改成功:
注意:mount命令在系统重启后会失效!也就是说,系统默认用户会在需要使用磁盘时候,将其挂载,不用的时候就不挂载,甚至会在使用结束后主动使用umount命令将其卸载。这点和windows很不一样,需要适应linux的挂载逻辑。
但如果希望该磁盘在系统启动时变自动挂载至指定点,也可以通过下面的设置达到目的。
首先通过下面命令找到该磁盘的格式以及 UUID=“123-456-789”:
sudo blkid /dev/sda
然后打开文件 sudo nano /etc/fstab 在文档末尾添加一行磁盘挂载信息后保存退出:
UUID=123-456-789 /data_raid ext4 defaults 0 0
说明:
- defaults 表示使用默认挂载选项。
- 第一个
0表示该文件系统不需要备份;1表示需要。 - 第二个
0处的值表示启动时需要被扫描的文件系统顺序。根文件系统的值应该为1,其他文件系统应该为2。对于挂载的存储盘,应该选择0:不扫描。
使用以下命令重新挂载 /etc/fstab 中的项:
sudo mount -a
使用 df -h 命令验证磁盘是否已成功挂载。
df -lh
以后该磁盘就会在系统启动时自动挂载至/data_raid。
5.5 修改机器名称
将下面两个文件中的机器名称做相应修改后,重启即可:
1 | sudo nano /etc/hostname |
5.6 开机进入emergency mode
有时候会碰到开机后进入emergency mode的情况(重启不会)。这种情况,一般是因为磁盘出了问题,或者挂载启动出了问题。
按照提示,先输入root密码登陆,然后打开日志文件
sudo nano journalctl -xb
然后在文件中搜索(直接输入即可)/fsck failed,看看是哪个磁盘出了问题。
假定出问题的磁盘是\dev\sda,那么执行下面命令:
1 | ## 这一步,只有当自己确定该盘可以卸载时,才使用,否则略过 |
5.7 vim常用命令汇总
vim是一款强大的文本编辑器,在UNIX和MASCOS系统中随系统默认安装 (vi)。在ubuntu下,可通过sudo apt install vim安装。过程中如出现vim-common版本过低等错误,则可先卸载vim-common再安装vim。
对于比较简单的文本编辑任务,使用轻量级编辑器nano挺好的。
但当编辑任务较为复杂时,vim往往是不二之选。事实上,vim高度可配置的特性,使得它可用于处理任何文本编辑任务。
较为完整的快捷键,可见这里:Vim Cheat Sheet。
部分常用命令摘录如下:
1 | Editing |
5.8 添加微软字体
对于ubuntu等开源Linux系统,一些常见的字体,如Times New Roman,并不会像Windows或者Macos那样随机附带,需要系统管理者自己安装。最简单的安装方式,是使用mscorefonts-installer,步骤如下:
- 首先更新软件源:
sudo apt-get update - 再安装微软系统的核心字体。注意:在弹出的选择界面,通过
tab键搭配回车来进行同意操作。
sudo apt-get install ttf-mscorefonts-installer - 再刷新缓存即可:
sudo fc-cache -f -v
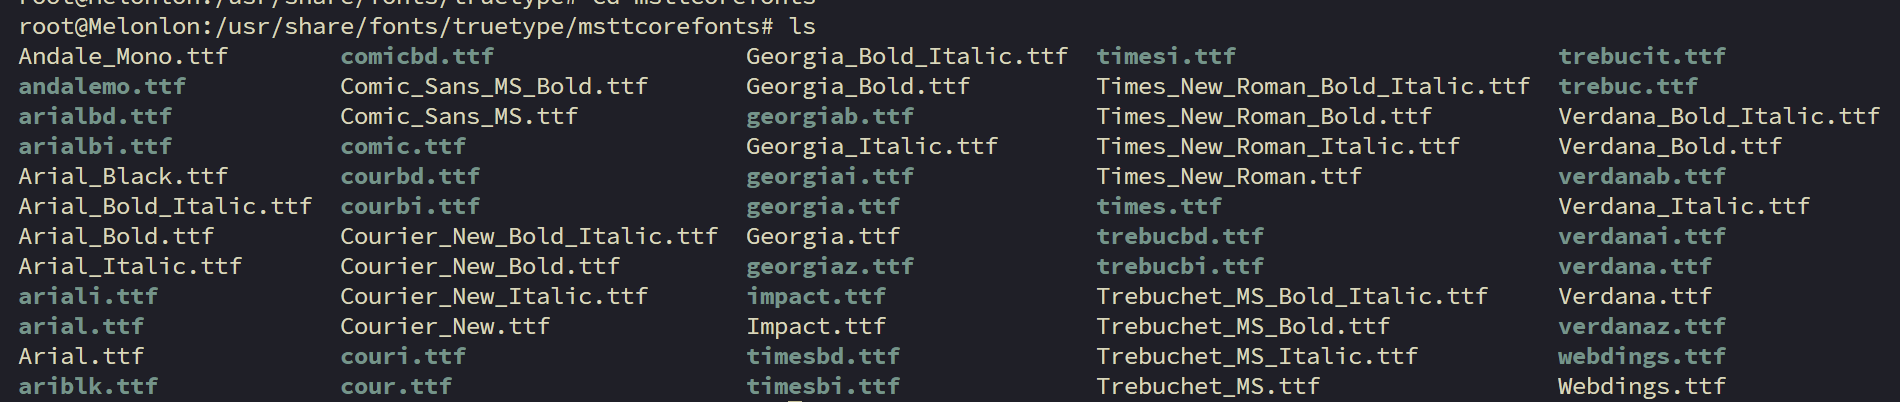
此时,常见的一些字体,如Times New Roman、Arial、Courier、Georgia、Verdanda等,都已安装到/usr/share/fonts/truetype/msttcorefonts/目录下,如下图所示。但是,仍可能碰到某些场景下无法调用已安装字体的情况。此时,继续删除相应缓存即可。以matplotlib为例,删除~/.cache/matplotlib/目录下的缓存文件即可。